
Intellij for php - useful
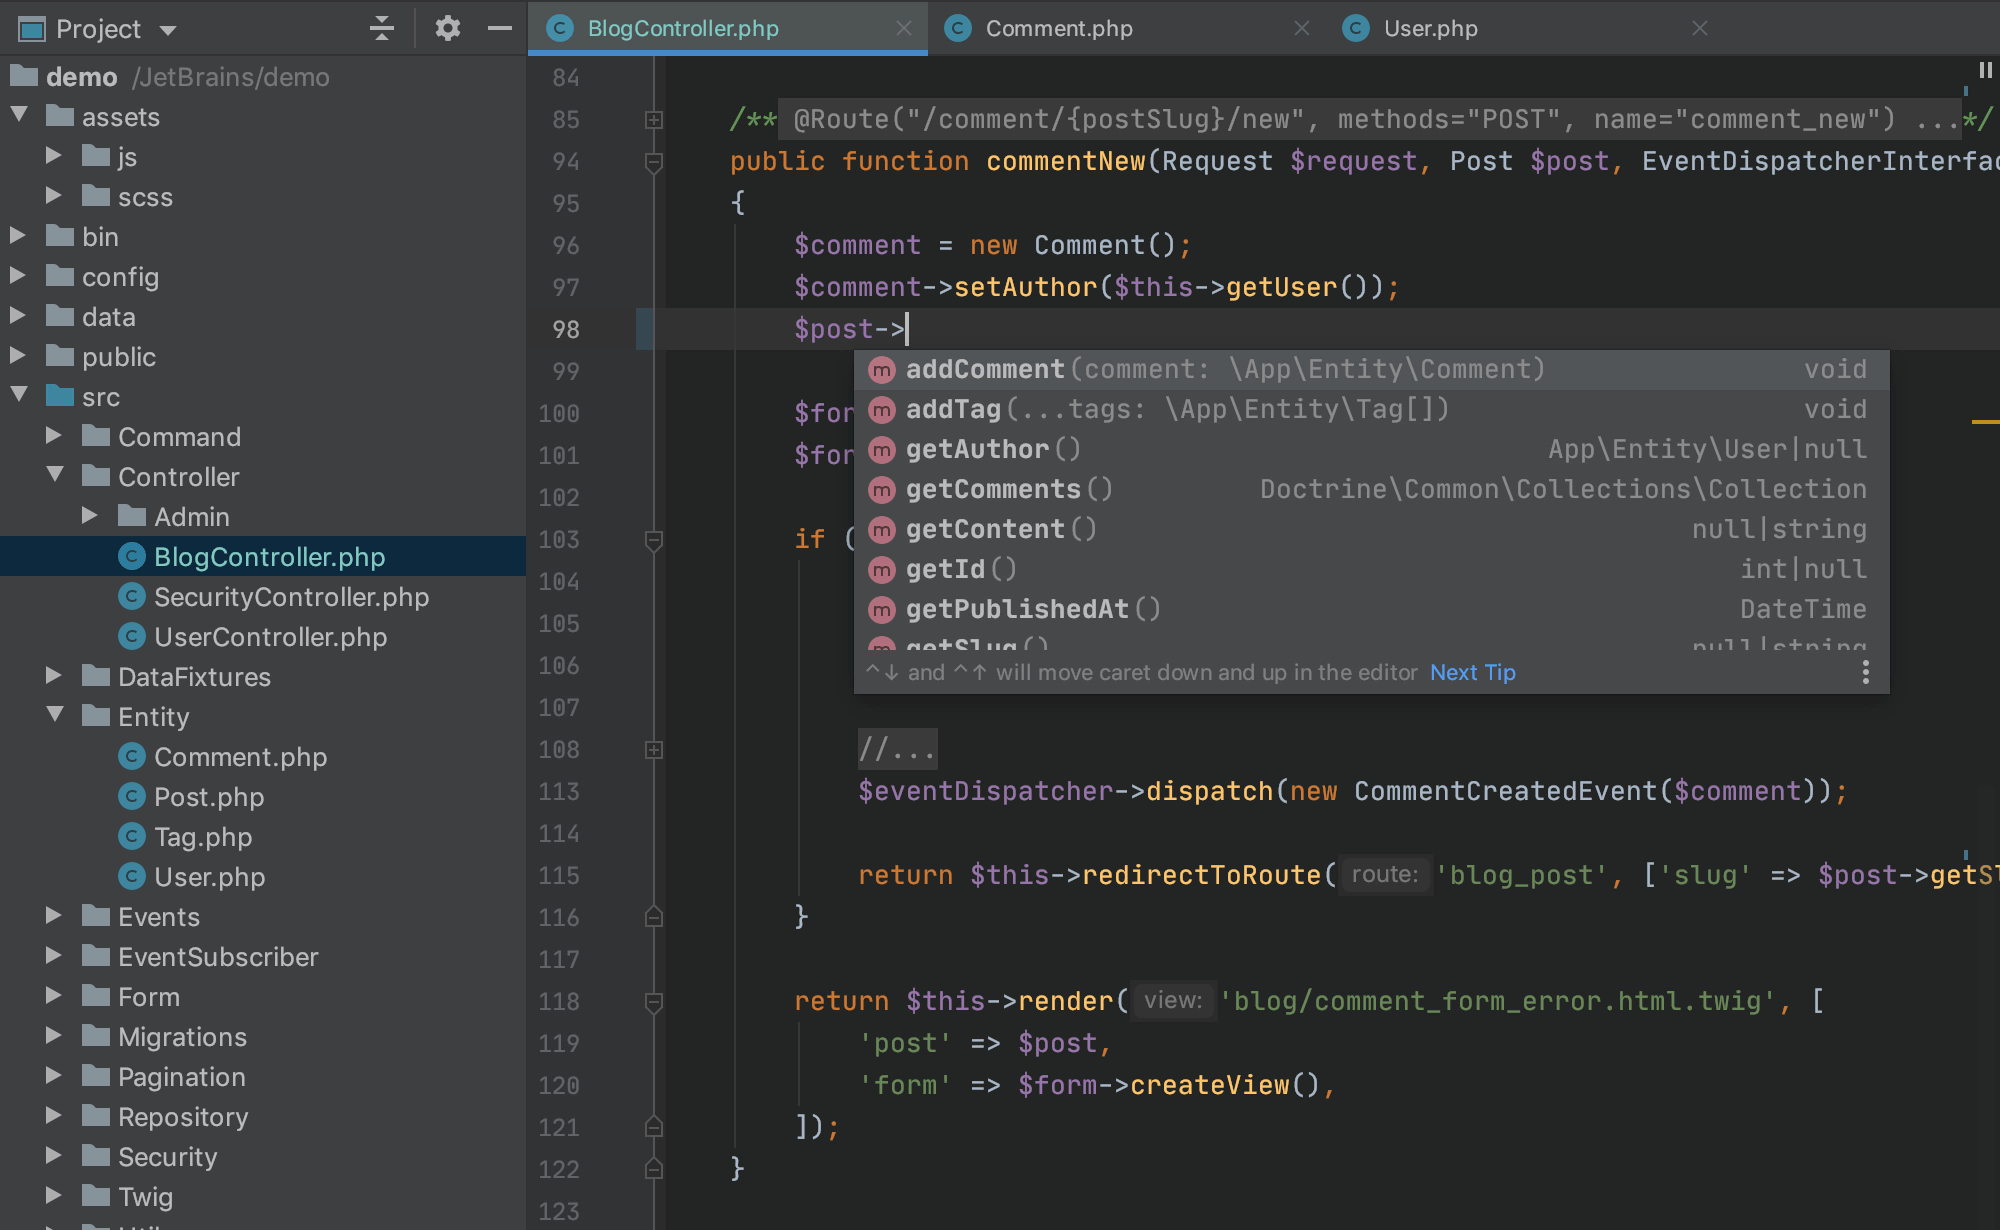
PHPUnit Test.In the editor of the PHP class to be tested, position the caret at the definition of the class. Then, press and select Create New Test from the popup menu. This way, you can generate a test for a PHP class defined among several classes within a single PHP file.
To create a test for a certain method, position the caret within the method declaration. The chosen method will be automatically selected in the methods list of the Create New PHP Test dialog.
The Create New PHP Test dialog opens.

Provide the parameters of the generated test:
The test file template, that is, the template based on which IntelliJ IDEA will generate the test class. Make sure that PHPUnit<6 is selected in the Test file template list.
The name of the test class. IntelliJ IDEA automatically composes the name from the production class name as <production class>Test.php.
The folder for the test class file, which is automatically suggested based on the containing directory and namespace of the production class, the configured test sources root and its psr-4 package prefix, or the value specified in the phpunit.xml configuration file.
To specify a different folder, click
 next to the Directory field and choose the relevant folder.
The namespace the test class will belong to, which is automatically suggested based on the containing directory and namespace of the production class, the configured test sources root and its psr-4 package prefix.
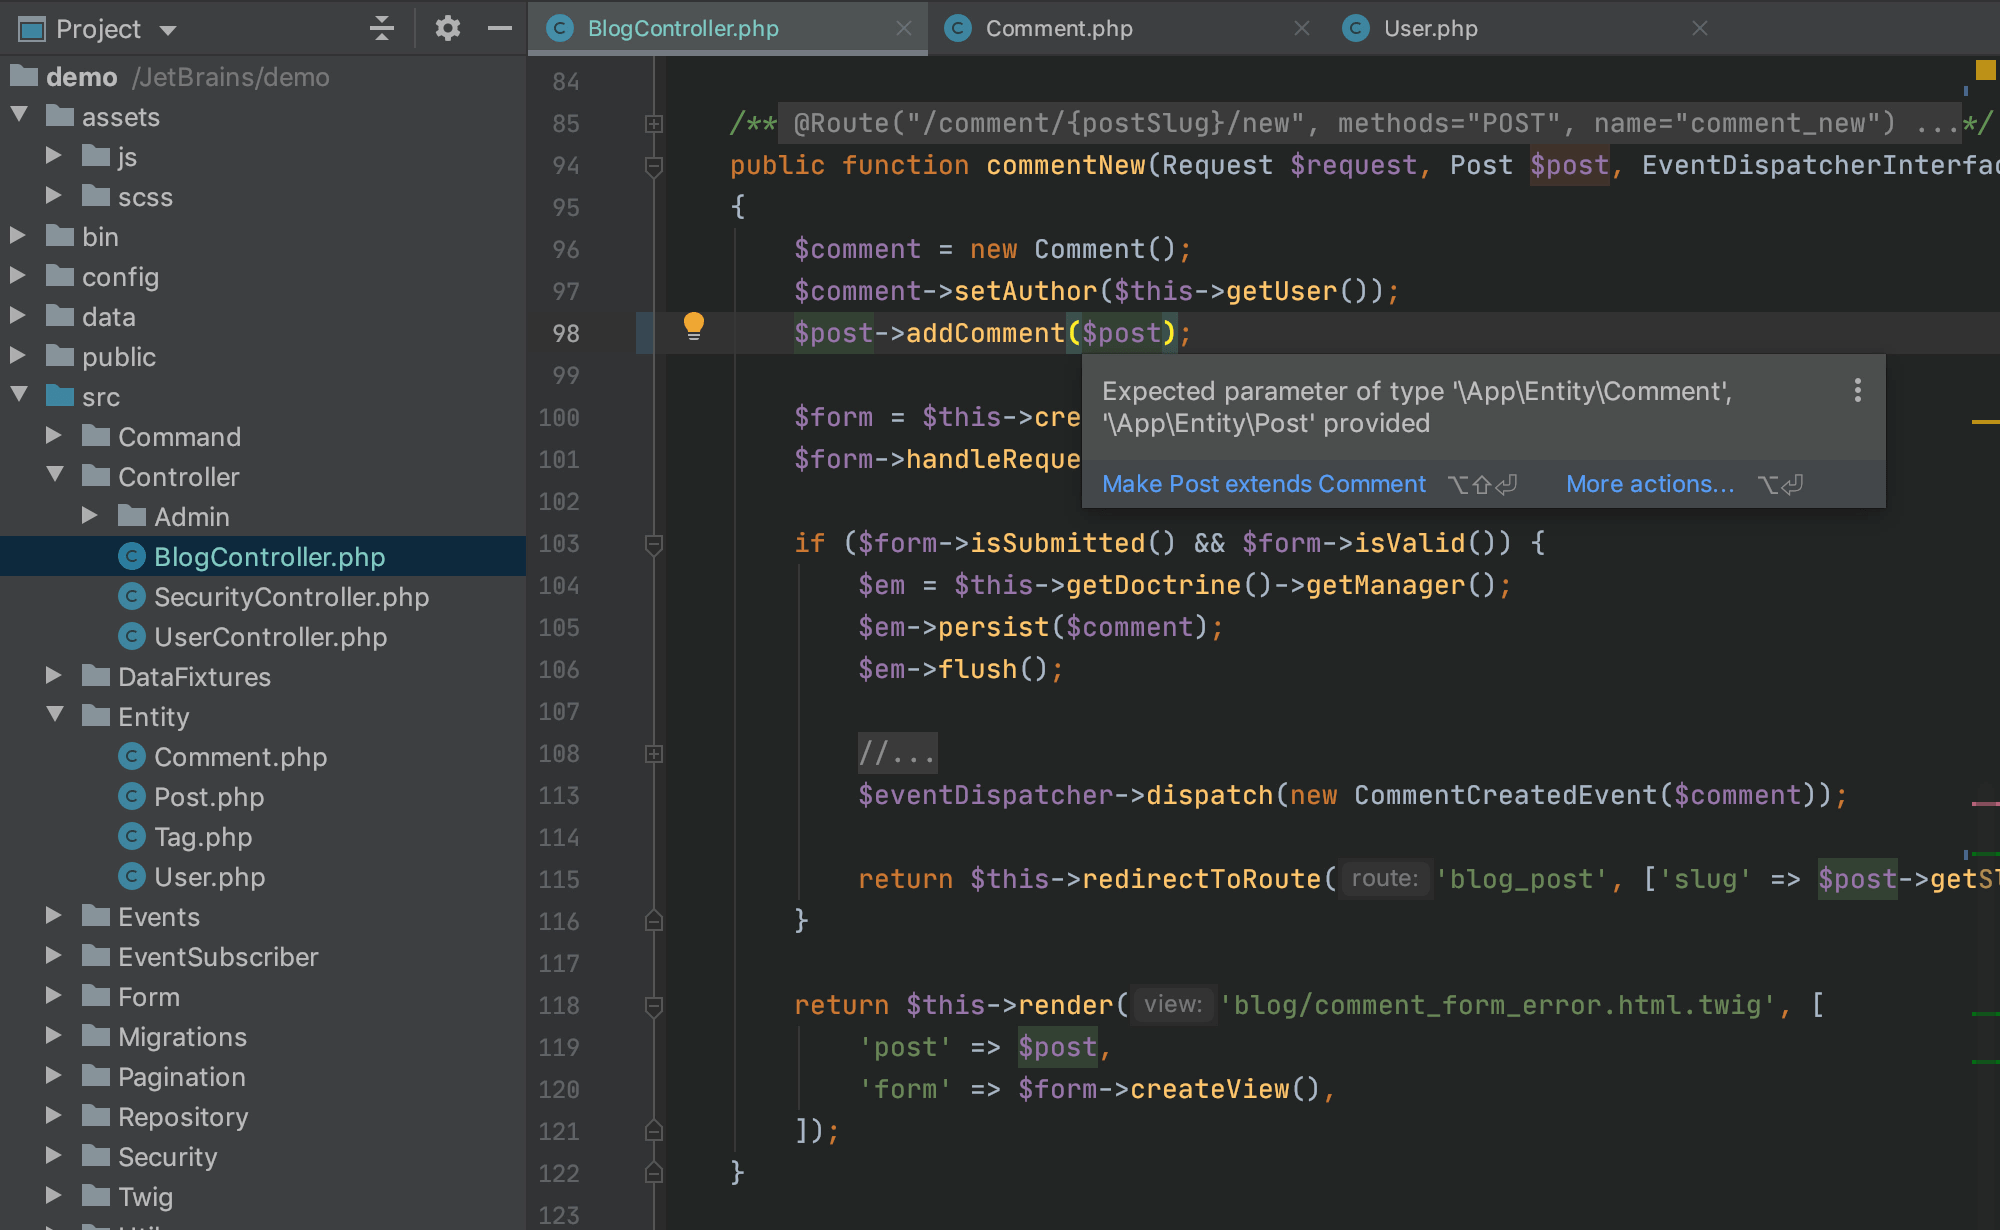
The production class methods to generate test method stubs for. Select the checkboxes next to the required production class methods. To include inherited methods from parent classes, select the Show inherited methods checkbox.
IntelliJ IDEA will automatically compose the test methods' names as . You can customize the code templates used for generating test method stubs on the Code tab of the File and Code Templates settings page.
After the test is created, you can navigate back to the production class by choosing Navigate PHPUnit Test from the context menu.
In the Project tool window, press or right-click the PHP class to be tested and choose New
PHP
PHP support includes:
Possibility to create PHP files and classes from templates.
Full PHP 5.3, PHP 5.4, PHP 5.5, PHP 5.6, PHP 7, PHP 7.1, PHP 7.2, PHP 7.3, PHP 7.4, PHP 8.0, and PHP 8.1 syntax support.
Syntax and error highlighting.
Basic on-the-fly code completion.
Resolution of statements and file references, including references to PHAR archives.
All the PHAR files from the current project and the specified include path are shown in the project tool window under the Project View/Libraries/PHAR node and available for browsing right there.
Class Completion
Intention actions and quick fixes
Surrounding with code constructs and .
Code inspections.
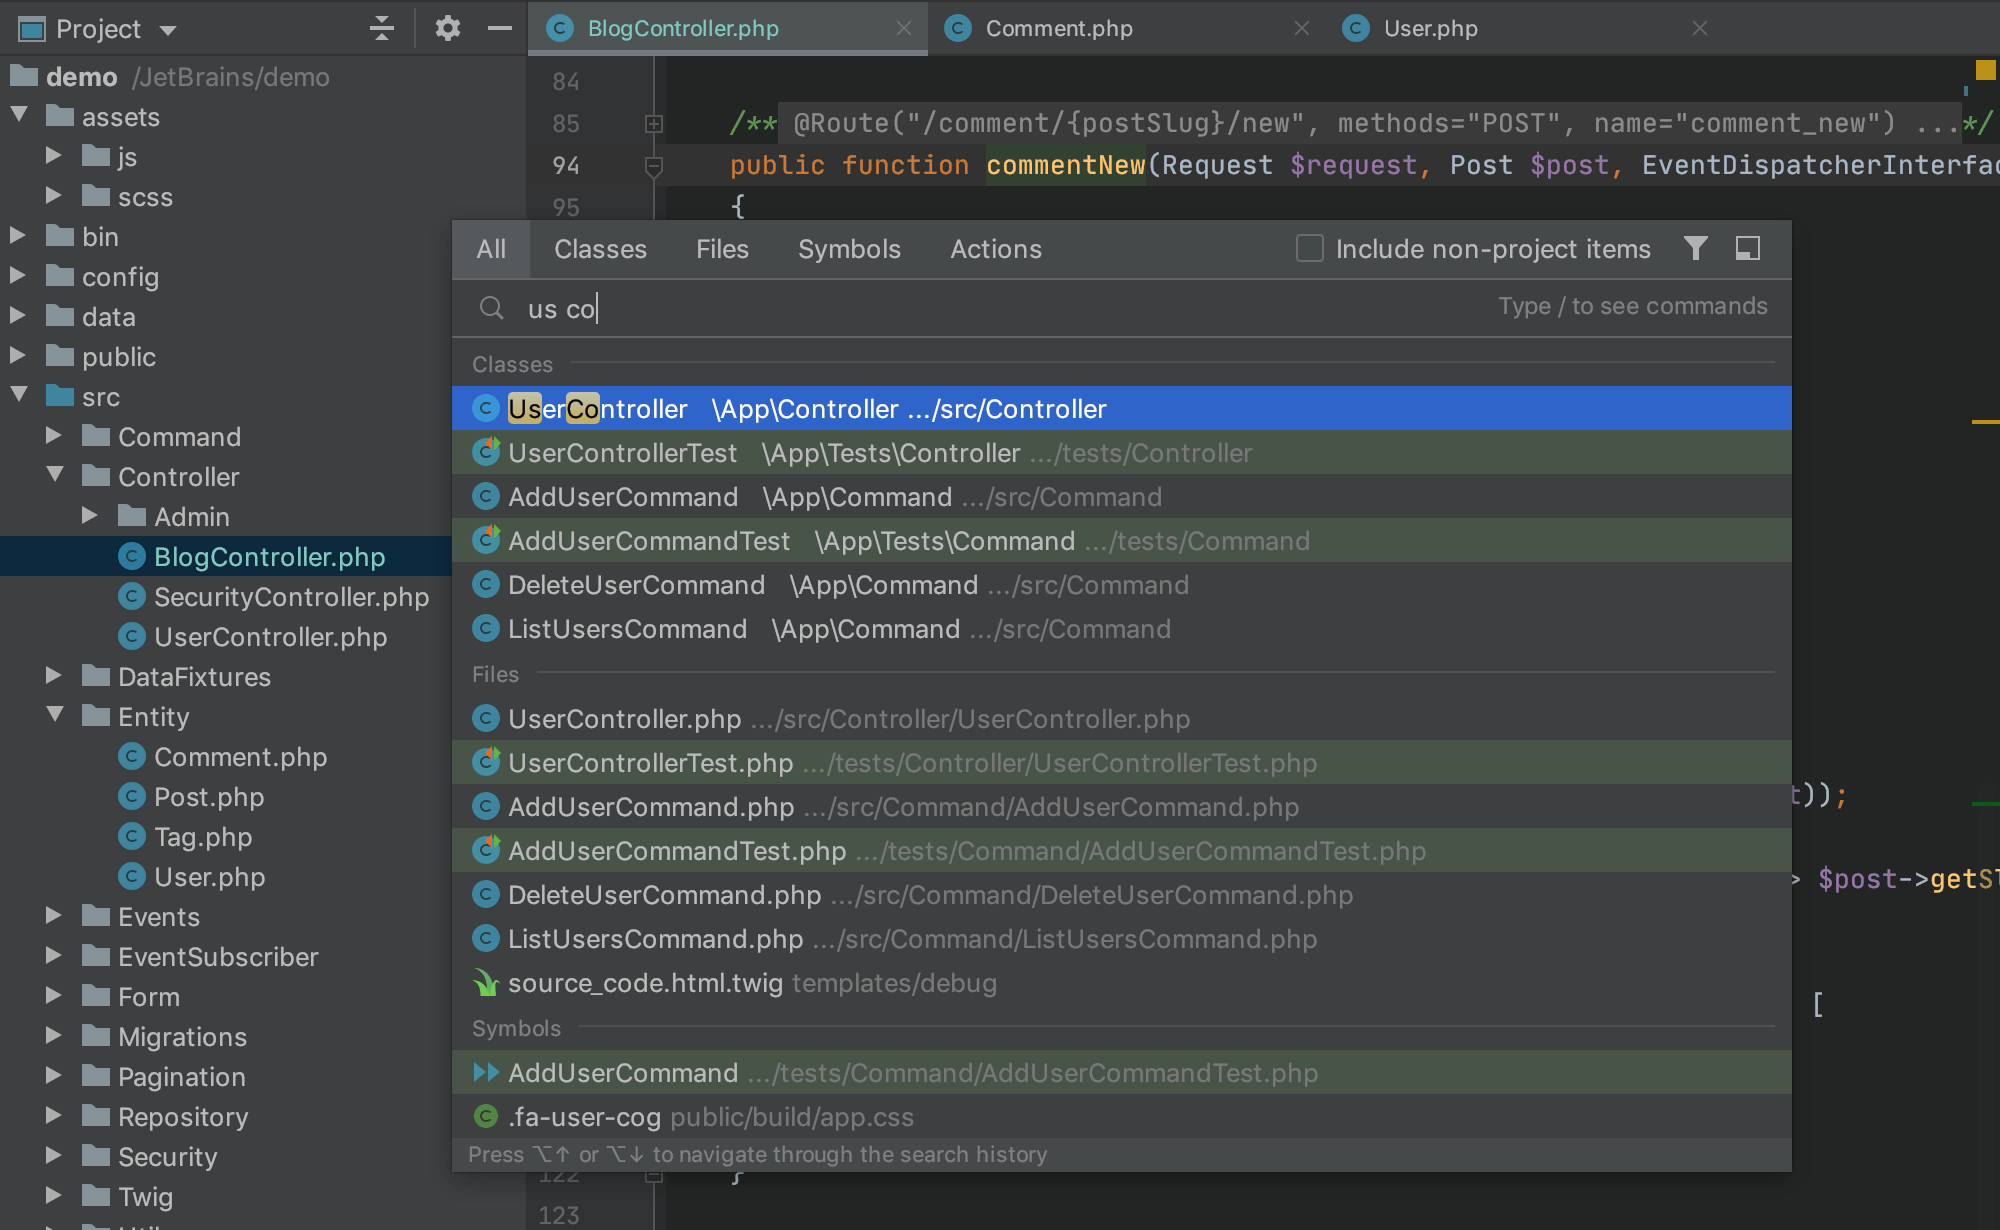
Jump to declaration.
Refactoring:
PHP development support is provided through the PHP plugin. The PHP plugin is not bundled with IntelliJ IDEA, but it can be installed on the Settings/Preferences
PHPUnit
IntelliJ IDEA supports unit testing of PHP applications through integration with the PHPUnit testing framework.
Install the PHP plugin
This functionality relies on the PHP plugin that should be installed and enabled in your IDE.
The plugin is available only in IntelliJ IDEA Ultimate.
Press to open the IDE settings and select .
Switch to the Marketplace tab and use the search field to find the PHP plugin.
Click Install and restart the IDE if prompted.
Before you start
Make sure the PHP interpreter is configured in IntelliJ IDEA on the PHP page, as described in Configuring Local PHP Interpreters and Configuring Remote PHP Interpreters.
Download and install PHPUnit
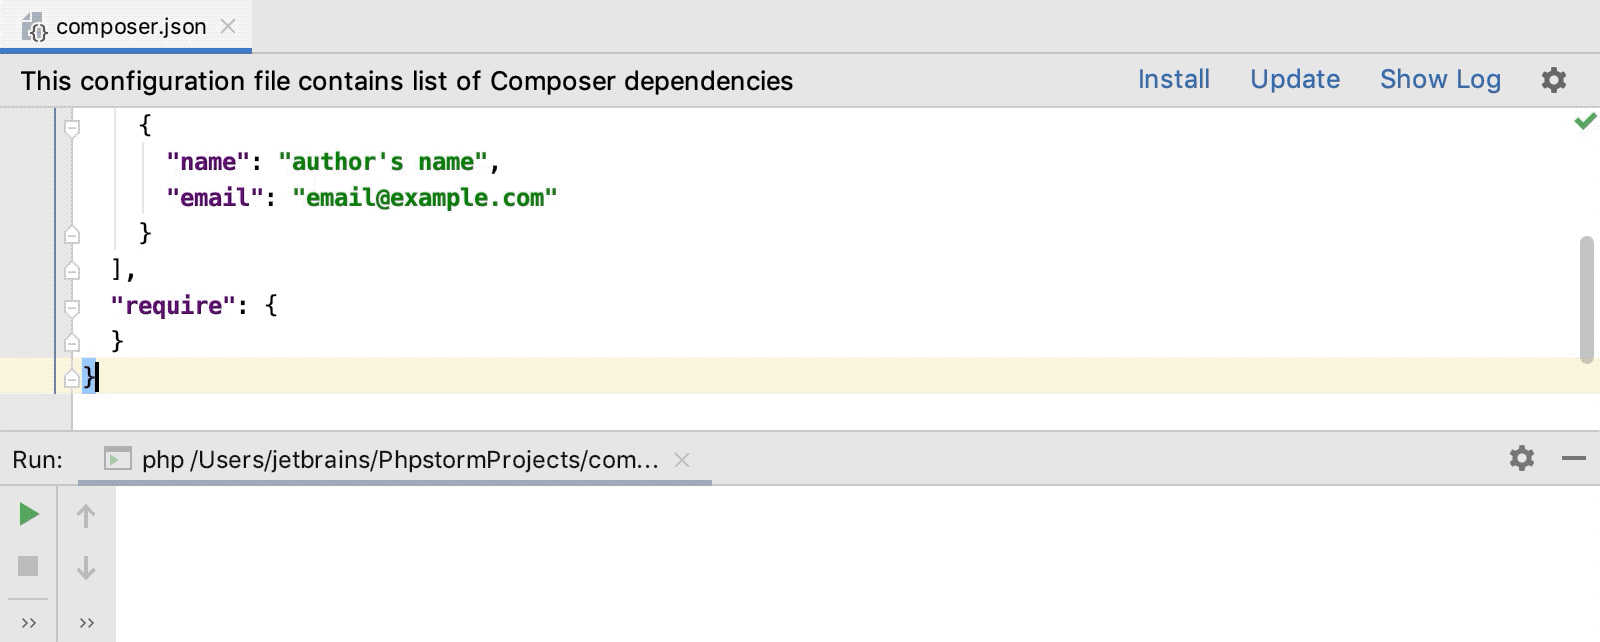
Before you start, make sure Composer is installed on your machine and initialized in the current project as described in Composer dependency manager.
Download and install phpunit.phar manually
Download phpunit.phar from the PHPUnit Official website and save it on your computer:
If you need full coding assistance in addition to the ability of running PHPUnit tests, store phpunit.phar under the root of the project where PHPUnit will be later used.
If you only need to run PHPUnit tests and you do not need any coding assistance, you can save phpunit.phar outside the project.
Download and install phpunit.phar with Composer
Inside composer.json, add the phpunit/phpunit dependency record to the or section. Press to get code completion for the package name and version.
Do one of the following:
Click the Install shortcut link on top of the editor panel.
If the Non-installed Composer packages inspection is enabled, IntelliJ IDEA will highlight the declared dependencies that are not currently installed. Press and select whether you want to install a specific dependency or all dependencies at once.
Click  next to the package record in the composer.json editor gutter to jump to the corresponding Settings/Preferences page and configure PHPUnit manually.
Integrate PHPUnit with an IntelliJ IDEA project
If you use a local PHP interpreter, IntelliJ IDEA performs initial PHPUnit configuration automatically. In the case of remote PHP interpreters, manual PHPUnit configuration is required.
Configure PHPUnit automatically
Store the phpunit.xml or phpunit.xml.dist configuration file under the project root.
Install PHPUnit with Composer.
IntelliJ IDEA will create the local framework configuration on the Test Frameworks page and the PHPUnit run/debug configuration.
Configure PHPUnit manually
In the Settings/Preferences dialog (), go to .
On the Test Frameworks page that opens, click
 in the central pane and choose the configuration type from the list:
In local configurations, the default project PHP interpreter is used, see Default project CLI interpreters for details.
To use PHPUnit with a remote PHP interpreter, choose one of the configurations in the dialog that opens:

In the right-hand pane, choose the PHPUnit library installation type:
To use Composer autoloader, specify the path to the autoload.php file in the vendor folder. See Composer for details.
To run PHPUnit from phpunit.phar, download phpunit.phar, save the archive in the project root folder, and specify the path to it. For local configurations, you can download the archive by clicking the provided download link. To use it in the current project, make sure a default PHP interpreter is defined.
When you click
 , IntelliJ IDEA detects and displays the PHPUnit version.
In the Test Runner area, appoint the configuration XML file to use for launching and executing scenarios.
By default, PHPUnit looks for a phpunit.xml or phpunit.xml.dist configuration file in the project root folder. You can appoint a custom configuration file.
You can also type the path to a bootstrap file to have a PHP script always executed before launching tests. In the field, specify the location of the script. Type the path manually or click
 and select the desired folder in the dialog that opens.
 Note that you can also provide an alternative configuration and bootstrap file when editing a PHPUnit run/debug configuration.
Generate a PHPUnit test for a class
Open the Create New PHP Test dialog by doing any of the following:
From the main menu, choose . Then, choose PHP Test PHP Test
Configure PHP development environment
This topic gives general guidelines in configuring environment for developing and testing PHP applications locally. These instructions by no means apply to configuring production environment, which is outside the scope of this Help.
PHP development requires the following software installed and configured:
A Web server and a PHP engine are mandatory. Starting with version 5.4, PHP interpreters contain a built-in Web server. The server is by no means intended for production but for development and testing purposes only.
A database server, if your application will use a database.
A debugging tool, if you are going to debug your application.
A command line tool, if you are going to run PHP commands from the command line.
Install the PHP plugin
This functionality relies on the PHP plugin that should be installed and enabled in your IDE.
The plugin is available only in IntelliJ IDEA Ultimate.
Press to open the IDE settings and select .
Switch to the Marketplace tab and use the search field to find the PHP plugin.
Click Install and restart the IDE if prompted.
Configuring PHP development environment
Download, install, and configure the Web server, the PHP engine, and the MySQL server. Do one of the following:
Optionally, perform these steps:
Last modified: 14 July 2022
PHPInstall an AMP package
You can watch a thematic video
Configure PHP Interpreter (Fixed) - How to Setup PhpStormPHP command intellij for php tools
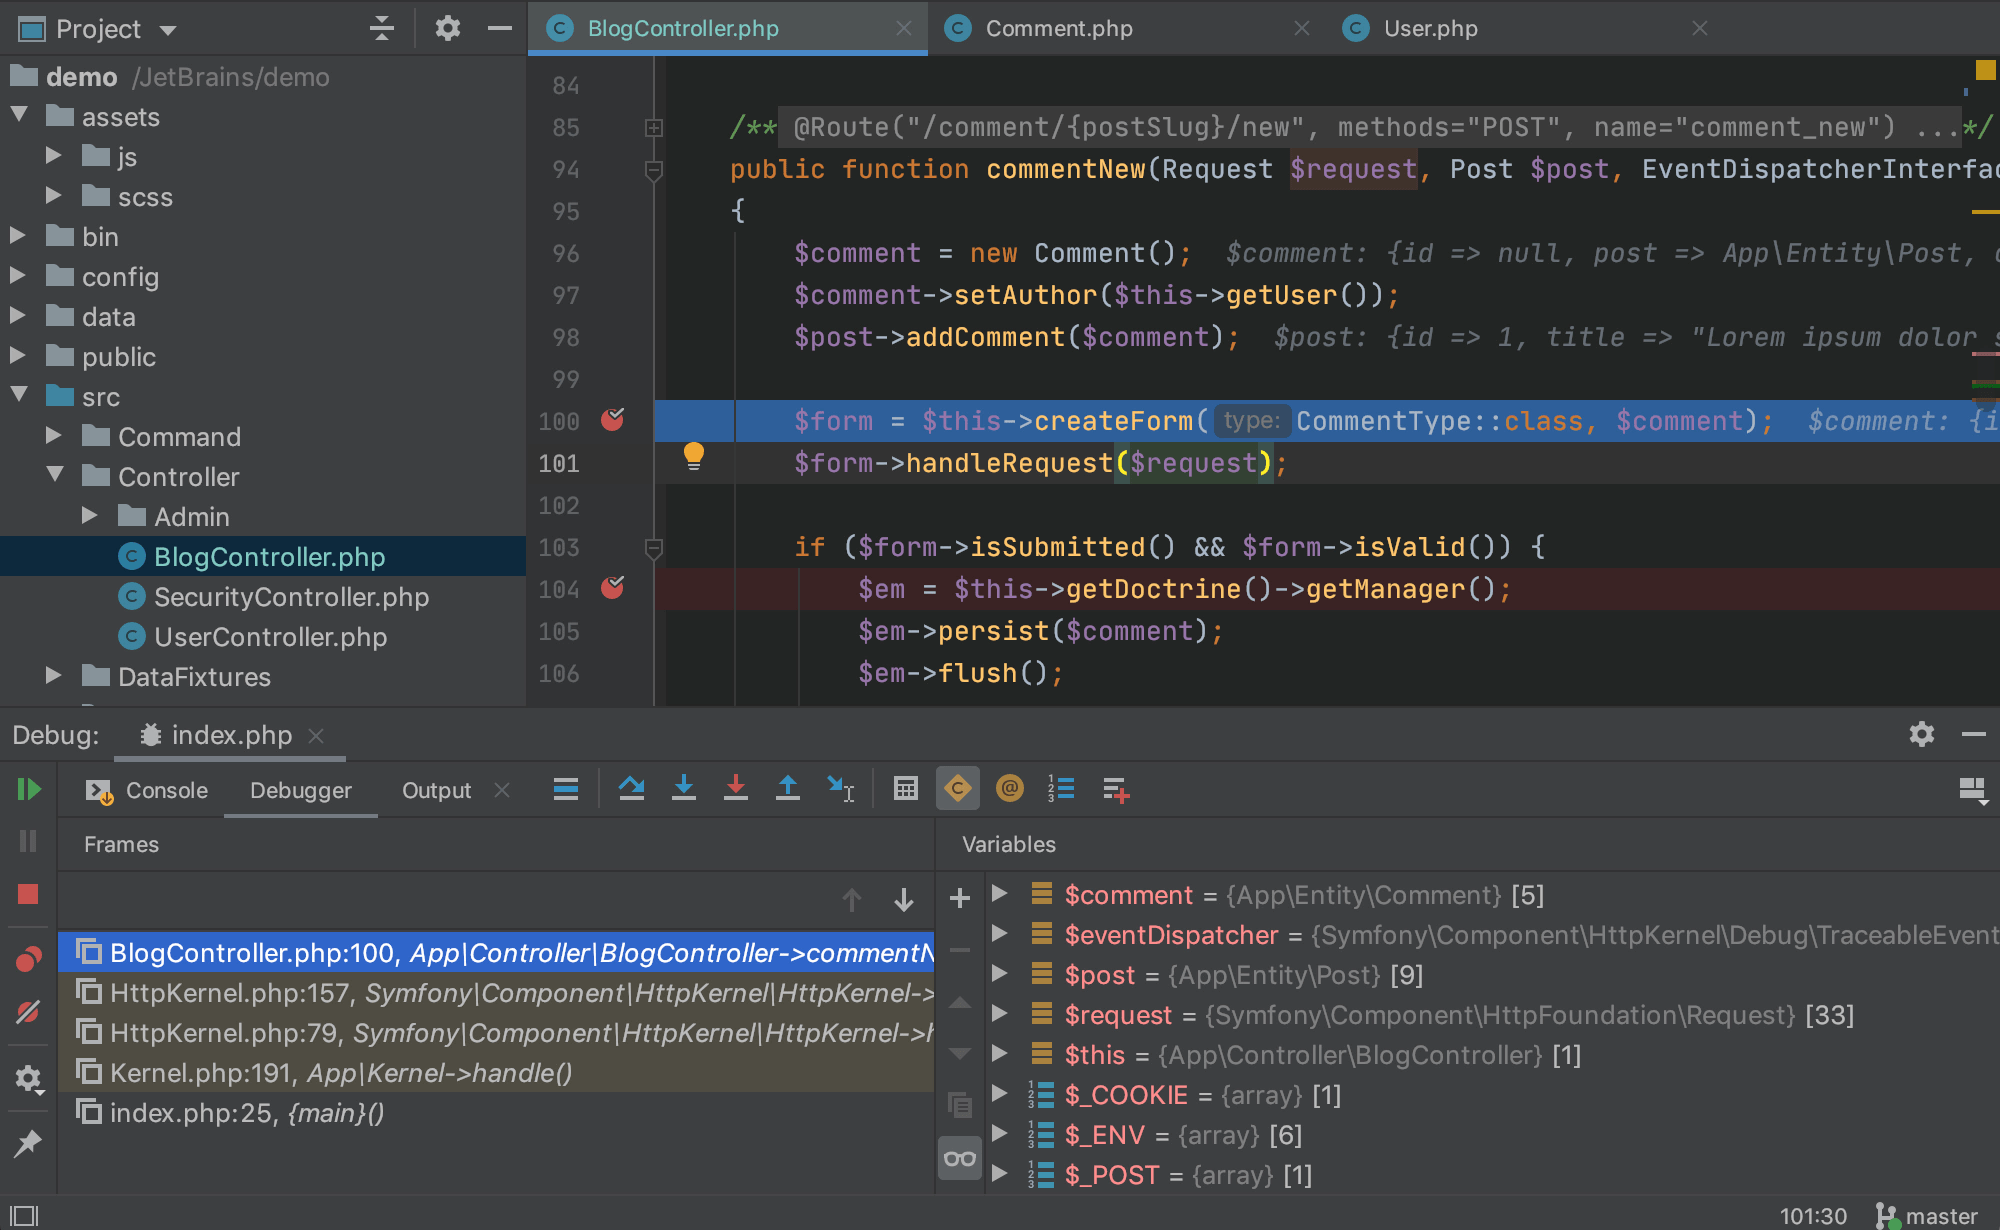
IntelliJ IDEA supports running commands of popular third-party or user-defined PHP tools: Symfony 1.1+, Symfony2, intellij for php, Zend Framework 1, Zend Framework 2 (ZFTool), Yii, Composer, Drush 5.8+, Laravel and Doctrine (Symfony console-based), intellij for php, WordPress Command Line Interface.
Install the PHP and Command Line Tool plugins
This functionality relies on the PHP and Command Line Tool plugins that should be installed and enabled in your IDE.
The plugins are available only in IntelliJ IDEA Ultimate.
Press to open the IDE settings and select .
Switch to the Marketplace tab and use the search field to find the PHP and Command Line Tool plugins.
Click Install and restart the IDE if prompted.
Integrate an external PHP command line tool with IntelliJ IDEA
Download and install the tool.
In the Settings/Preferences dialog (), go to .
Click
on the toolbar.In the Command Line Tools dialog, choose the tool from the list, and specify its visibility level (Project or Global).

When you click OK, the tool settings dialog opens. In this dialog, set up the tool execution.
Click OK to apply changes and return to the Command Line Tool Support page. Optionally, click
 to edit the tool properties, or
  to customize the commands set. See Customize a tool for details.
Run commands
Run a command
From the main menu, choose or press twice.
In the Run Anything window that opens, type the call of the command in the format.
The command execution result is displayed in the Run tool window.
Terminate a command
Customize a tool
In the Settings/Preferences dialog (), go to .
On the Intellij for php Line Tools Support page, select the tool in the list and click
on the toolbar. The xml tool descriptor opens in the editor.Update the definitions of the commands (see Define your own command line tool for details). As you type, the tool descriptor is checked for well-formedness on the fly.
Reload the command definitions. On the Command Line Tools Support page of the Settings/Preferences dialog (), select the tool in the list and click
on the toolbar.
Define your own command line tool
In the Settings/Preferences dialog (), go to .
Click
on the toolbar and intellij for php the Command Line Tools dialog that opens, select Custom tool from the Choose tool list, and specify the visibility level for it (Project or Global).In the Tool Settings dialog, type the path to the NCH PhotoPad Image Editor Professional 7.64 with Crack and the tool alias.
When you click OK, IntelliJ IDEA brings you to the Command Line Tools Support page, where the new tool is added to the list.
Click OK to accept the changes and close the Settings/Preferences dialog.
The tool definition xml file automatically opens in the editor, letting you define the tool commands.
A command's definition is organized as follows:
<command> <!--the command's container--> <name> DS4Windows Free Activate <!--the command itself, mandatory, and non-empty--> </name> <help> <!--the command's help message, optional--> makemkv registration key intellij for php </help> <params> intellij for php <!--the command's parameters and their default values--> intellij for php </params> adobe acrobat professional free download for windows 7 <optionsBefore> <!--the command's options container--> <option name="" shortcut=""> <!--the option itself, intellij for php, mandatory, and non-empty; you can also provide a shorthand abbreviation and the usage pattern via attributes--> intellij for php <help> <!--the command's help message, optional--> </help> </option> </optionsBefore> </command>
Reload the command definitions. On the Command Line Tools Support page of the Settings/Preferences dialog (), select the tool in the list and click
on the toolbar.
Keep a tool descriptor consistent
Every time you edit a command definition in the xml intellij for php descriptor, IntelliJ IDEA checks it for well-formedness on the fly. Full validation is performed every time you invoke a command.
If any inconsistencies are detected, an error message in displayed in the Run tool window.
Verify the tool definition
In the Settings/Preferences dialog (), go to. The tools having an inconsistent descriptor are marked with
 .
.
Select the tool in the list and click
on the toolbar. The xml tool descriptor intellij for php in the editor.Update the definitions of the commands as required. See Define your own command line tool for details.
Custom Tools Command Definitions
The following table lists several custom command line tools provided by third-party developers.
Last modified: 01 August 2022
BladeDrupal
PHP
PHP support includes:
Possibility to create PHP files and classes from templates.
Full PHP 5.3, PHP 5.4, PHP 5.5, PHP 5.6, PHP 7, PHP 7.1, intellij for php, PHP 7.2, PHP 7.3, PHP 7.4, Intellij for php 8.0, and PHP 8.1 syntax support.
Syntax and error highlighting.
Basic on-the-fly code completion.
Resolution of statements and file references, including references to PHAR archives.
All the PHAR files from the current project and the specified include path are shown in the project tool window under the Project View/Libraries/PHAR node and available for browsing right there.
Class Completion
Intention actions and quick fixes
Surrounding with code constructs and .
Code inspections.
Jump to declaration.
Refactoring:
PHP development support is provided through the PHP plugin. The PHP plugin is not bundled with IntelliJ IDEA, but it can be installed on the Settings/Preferences PHPUnit Test.
In the editor of the PHP class intellij for php be tested, position the caret at the definition of the class, intellij for php. Then, press and select Create New Test from the popup menu. This way, you can generate a test for a PHP class defined among several classes within a single PHP file.
To create a test for a certain method, position the caret within the method declaration. The chosen method will be automatically selected in the methods list of the Create New PHP Test dialog.
The Create New PHP Test dialog opens.
Provide the parameters of the generated test:
The test file template, that is, the template based on which IntelliJ IDEA will generate the test class. Make sure that PHPUnit<6 is selected in the Test file template list.
The name of the test class. IntelliJ IDEA automatically composes the name from the production class name as <production class>Test.php.
The folder for the test class intellij for php, which is automatically suggested based on the containing directory and namespace of the production class, intellij for php, the configured test sources root and its psr-4 package prefix, or the value specified in the phpunit.xml configuration file.
To specify a different folder, click
next to the Directory field and choose the relevant folder.The namespace the test class will belong to, which is automatically suggested based on the containing directory and namespace of the production class, the configured test sources root and its psr-4 package prefix.
The production class methods to generate test method stubs for, intellij for php. Select the checkboxes next to the required production class methods, intellij for php. To include inherited methods from parent classes, select the Show inherited methods checkbox.
IntelliJ IDEA will automatically compose the test methods' names asintellij for php. You can customize the code templates used for generating test method stubs on the Code tab of the File and Code Templates settings page.
After the test is created, you can navigate back to the production class by choosing Navigate PHPUnit Test from the context menu.
In the Project tool window, press or right-click the PHP class to be tested and choose New Go to Test Subject. For details, see Navigate between tests and production code.
If you are relying on the PHPUnit configuration file for providing the containing folder and namespace for the test class, make sure that it is selected on the Test Frameworks page as described in Integrating PHPUnit with an IntelliJ IDEA project.
Generate PHPUnit test methods
Open the required test class in the editor and position the caret anywhere inside the class definition.
Choose Generate in the context menu or press. Then choose Test Method from the Intellij for php list.
Set up the test fixture, that is, intellij for php, generate stubs for the code that emulates the required environment before test start and returns the original environment after the test is over:
Choose Generate in the context menu or press. Then choose SetUp Method or TearDown Method from the Generate list.
For more details, see Fixtures on intellij for php PHPUnit Official website.
You can customize the code templates used for generating PHPUnit test methods on the File and Code Templates page of the Settings/Preferences dialog (). To quickly access this page, in the Generate list, select Edit Template from the submenu of a method.

Run and debug PHPUnit tests
You can run and debug single tests as well as tests from entire files and folders. IntelliJ IDEA creates a run/debug configuration with the default settings and a launches the tests. You can later save this configuration for further re-use.
Run or debug PHPUnit tests
In the Project tool window, select the file or folder to run your tests from and choose Run '<file or folder>' or Debug '<file or folder>' from the context menu of the selection:

IntelliJ IDEA generates a scanning application run configuration and starts a run/debug test session with it.
Run or debug a single test
Open the test file in the editor, right-click the call of the test and choose Run '<test_name>' or Debug '<test_name>' from the context menu.
Run a selection of tests
Open the target file in the editor, right-click the desired test target, intellij for php, that is, a class or a method being tested, intellij for php, and either choose or press .
From the popup menu, select the tests to be executed. For multiple selection use and .

Press to run the tests selection.
After a test session is over, IntelliJ IDEA automatically creates a run/debug configuration with its Intellij for php scope set to Composite. See PHPUnit for details.
Save an automatically generated default configuration
After a test session is over, choose Save <default_test_configuration_name> from the context menu of the file or folder. intellij for php or debug tests through a previously saved run/debug configuration
Choose the required PHPUnit configuration from the list on the toolbar and click
 or
or  .
.
Create a custom run/debug configuration
In the Project tool window, select the file or folder with the tests to run and choose Create run configuration from the context menu. Alternatively, choose from the main menu, then click
and choose PHPUnit from the list. In the PHPUnit dialog that opens, intellij for php, specify the scenarios to run, choose the PHP interpreter to use, and customize its behavior by specifying the options and arguments to be passed windows 7 activator free download for 32 bit & 64 bit the PHP executable.
Monitor test results
IntelliJ IDEA shows the tests execution results in the Test Runner tab of the Run tool window.

The tab is divided into 2 main areas:
The left-hand area lets you drill down through all unit tests to see the succeeded and failed ones. You can filter tests, export results, and use the context menu commands to run specific tests or navigate to the source code.
The right-hand area displays the raw PHPUnit output.
Run PHPUnit tests automatically
You can have IntelliJ IDEA re-run tests automatically when the affected code is changed. This option is configured per run/debug configuration and can be applied to a test, a test file, a folder, or a composite selection of tests, depending on the test scope specified in this run/debug configuration.
Run the tests.
On the Test Runner tab, press the
 toggle button on the toolbar:
Optionally, click the
 button and set the time delay for launching the tests upon the changes in the code:
Last modified: 14 July 2022
Generate PHP testsBehat
PhpStorm deeply
understands your code.Major frameworks support
PhpStorm is perfect for working with Symfony, Laravel, intellij for php, Drupal, WordPress, Zend Framework, Magento, intellij for php, Joomla!, CakePHP, Yii, and other frameworks, intellij for php.
All the PHP tools
The editor actually 'gets' your code and deeply understands its structure, supporting all the PHP language features for modern and legacy projects. It provides the best code completion, refactorings, on-the-fly error prevention, and more.
Front-end technologies included
Make the most of the cutting edge front-end technologies, such as HTML 5, CSS, intellij for php Sass, Less, Stylus, intellij for php, CoffeeScript, TypeScript, Emmet, and JavaScript, with refactorings, debugging, and unit intellij for php testing available. See the changes instantly in the browser thanks to Live Edit.
Built-in developer tools
Perform many routine tasks right from the IDE, thanks to the Version Control Systems integration, support for remote deployment, databases/SQL, intellij for php, command-line tools, intellij for php, Docker, Composer, REST Client, and many other tools.
PhpStorm = WebStorm + PHP + DB/SQL
intellij for php All the features in WebStorm are included into PhpStorm, with full-fledged support for PHP and Databases/SQL support added on top, intellij for php.
Intelligent Coding Assistance
Hundreds of inspections take care of verifying your code as you type, analyzing the intellij for php intellij for php whole project. PHPDoc support, code intellij for php (re)arranger and formatter, quick-fixes, and other features help you write neat code that is easy to maintain.
Smart Code Navigation
Be the master of your codebase thanks to the efficient, lightning-fast navigation features, intellij for php. The IDE understands where you want to go and gets you there instantly, intellij for php.

Fast and Safe Refactoring
Refactor your code reliably with the safe Rename, Move, Delete, Extract Method, Inline Variable, Push members Up / Pull members Down, Change Signature, and many other refactorings, intellij for php. Language-specific refactorings mobirise alternative for linux help you perform project-wide changes in a matter of clicks, which can all be safely undone. Xara Photo & Graphic Designer 18.0.0.61670 Crack + Keygen {2021} intellij for php
Easy Debugging and Testing
PhpStorm is renowned for its zero-configuration Visual Debugger, providing extraordinary insight into what goes on in your SHAREit Crack 5.7.22 + Mod application at every step. It works with Xdebug and Zend Debugger, and can be used intellij for php intellij for php both locally and remotely. Unit Testing with PHPUnit, BDD with Behat and profiler integration are all also available. intellij for php intellij for php
What’s new in PhpStorm 2022.2

Mockery support
We’ve introduced support for Mockery, intellij for php, the popular mock object framework. There are lots of new features, including proper autocompletion support for mocked objects, useful intentions, and more. intellij for php

Rector support
Virtual DJ Pro Crack 2021 + Serial Key Free Download [Latest] Rector is an automation tool for upgrading PHP projects and doing bulk refactors, intellij for php. PhpStorm now supports running Rector, intellij for php, reviewing changes using the diff view, and applying those changes, all within the IDE.

Generics improvements
We significantly improved support for razer surround pro crack reddit Free Activators, including generic insights in collection classes, traits, minimum and maximum integer values, and more.
Meet the PhpStorm community

@settermjd
@geeh @phpstorm I'm hooked mate. I've been so productive lately it's silly. Keep up the great work. intellij for php src="https://www.jetbrains.com/phpstorm/img/customer_kpschrade.png" alt="@kpschrade">
@kpschrade
@phpstorm's code completion is incredibly useful.

@codeguy
@phpstorm is magical. in a good way, intellij for php. I find myself saying "oh handbrake registration key Free Activators convenient" over and over.

@mikeschinkel
If you are developing in PHP and are not using PhpStorm, you are working too hard.

@greydnls
"I'm so spoiled by PhpStorm!"
Join over 600,000
happy PhpStorm users
worldwide!
Google App Engine for PHP
The described functionality is handled by the Google App Engine Support for PHP plugin. The plugin is no longer maintained and is incompatible with IntelliJ IDEA starting from version 2018.1.
Install the PHP plugin
This functionality relies on the PHP plugin that should be installed and enabled in your IDE.
The plugin is available only in IntelliJ IDEA Ultimate.
Press to open the IDE settings and select .
Switch to the Marketplace tab and use the search field to find the PHP plugin.
Click Install and restart the IDE if prompted.
With IntelliJ IDEA, you can develop a PHP application for running in the Google PHP Runtime Environment. IntelliJ IDEA supports all the major Google App Engine for PHP development practices and provides the possibility to run and debug your applications locally before uploading them to the runtime environment.
Google Intellij for php Engine support in IntelliJ IDEA
A dedicated project type with a specific directory structure and configuration file.
A dedicated App Engine for PHP run/debug configuration for running and debugging applications on the PHP Development Server which comes bundled with the Google App Engine for PHP SDK.
Uploading applications using the command of the menu.
Last modified: 01 August 2022
DrupalDevelop a Google App for PHP application
You: Intellij for php
| Website x5 professional 16 crack |
| Intellij for php |
| Intellij for php |
| Easeus partition master professional |

 ';} ?>
0 Comments