
Sony vegas pro best render settings - cleared

This tutorial will teach you how to set up Sony Vegas Pro for rendering/exporting 1080p or 720p HD Video suitable for YouTube.
There are always many different ways to skin a cat with Sony Vegas Pro 13. After the release of Vegas Pro 12, Sony has created some easy to use Internet Rendering Templates under the MainConcept AVC/AAC (.mp4) format.
Mainconcept uses the H.264 codec which is widely used and accepted on all websites, so it is a safe choice to use. Mainconcept produces a slightly higher contrast look with very vivid colours. If your Bit Rate is on the low side, you can lose some detail in dark and shadowy areas of your video. It does have the advantage of the option to use your GPU (Graphics Card) to help speed up your rendering times. Please note that you will need a compatible Graphics Card for GPU Acceleration to work. You can read more about the requirements for GPU Acceleration[www.sonycreativesoftware.com] here on the official Sony Creative Software website.
The other choice you could use for making your videos is Windows Media Video (.wmv)
Windows Media Video creates a slightly different look to Mainconcept, which some people may prefer. The colours are a little more muted with this codec, however it does hold onto small detail in any dark and shadowy areas of your video.
One dis-advantage of Windows Media Video is that it is extremely CPU intensive when rendering. So it takes a lot of juice and time to render this codec out. You will also need a fair amount of RAM (memory) installed if you intend to render full 1080p video with WMV. On lower powered computers with not enough memory, it can just keel over and die halfway through rendering.
Rendering to an Interent Template does not limit you to just uploading it to a website. You can also use this format for playback on your computer.
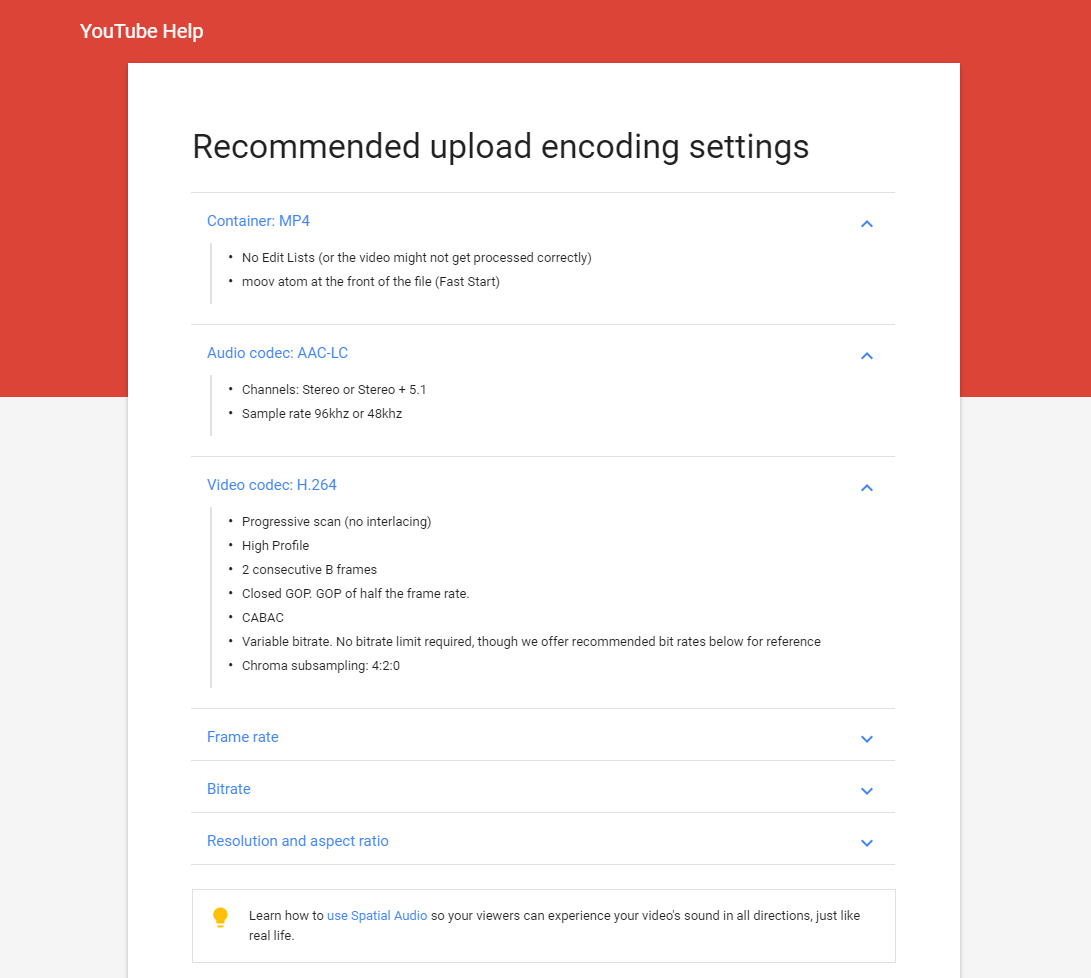
- No Edit Lists (or the video might not get processed correctly)
- moov atom at the front of the file (Fast Start)
- Channels: Stereo or Stereo + 5.1
- Sample rate 96khz or 48khz
- Progressive scan (no interlacing)
- High Profile
- 2 consecutive B frames
- Closed GOP. GOP of half the frame rate.
- CABAC
- Variable bitrate. No bitrate limit required, though we offer recommended bit rates below for reference
- Chroma subsampling: 4:2:0
Content should be encoded and uploaded in the same frame rate it was recorded.
Common frame rates include: 24, 25, 30, 48, 50, 60 frames per second (other frame rates are also acceptable).
Interlaced content should be deinterlaced before uploading. For example, 1080i60 content should be deinterlaced to 1080p30, going from 60 interlaced fields per second to 30 progressive frames per second.
The bitrates below are recommendations for uploads. Audio playback bitrate is not related to video resolution.
- Recommended video bitrates for uploads
(24, 25, 30)
(48, 50, 60)
- Recommended audio bitrates for uploads
Learn how to use resolution and aspect ratios correctly.[support.google.com]
https://steamcommunity.com/tradeoffer/new/?partner=112059918&token=VSY80HVf
I hope that has helped you, leave a comment below if you have any suggestions, thanks!
- This[www.moviestudiozen.com] article written by Derek Moran[www.moviestudiozen.com].
- Special thanks to ''DarthWound'', ''hlsavior'', ''Patrick McKenna'', ''Dave Osbun'' and ''John Rofrano''.
Vegas Pro 15 Tutorial: Best YouTube 1080p Render Settings
I’d like to show you the best render settings I’ve found for creating YouTube 1080p videos using Sony Vegas Pro 15.
As of writing, these instructions also work in later versions of Vegas Pro.
If you’ve ever wanted to export a video from Sony Vegas but you’re unsure which quality and format settings to pick, it can be a little daunting unless you know what you’re doing. So please follow closely and lets get started.
Our Selection
First of all, make sure that the video you want to render has been highlighted on the timeline. I’m using a colour gradient inside a video track.

Settings
Click on the settings icon in the top left corner of the preview area.

The best starting template is going to be HD 1080-60i (1920x1080, 29.970 fps).

From here I would change the framerate to 60fps. The closest available option is 59.940 (Double NTSC) however you can manually type in the number 60.000 as an override.

Next up, make sure that the Full-resolution render quality is set to Best. Motion blue should be set to Gaussian. Deinterlace method should be configured for Blend Fields and Resample mode should be on Disable resample.

When you’re happy with the settings, type in a name for your new template and hit the Save Template button.

Rendering With Our New Settings
Making sure that our video is still highlighted in the timeline. Click on File and then Render As.
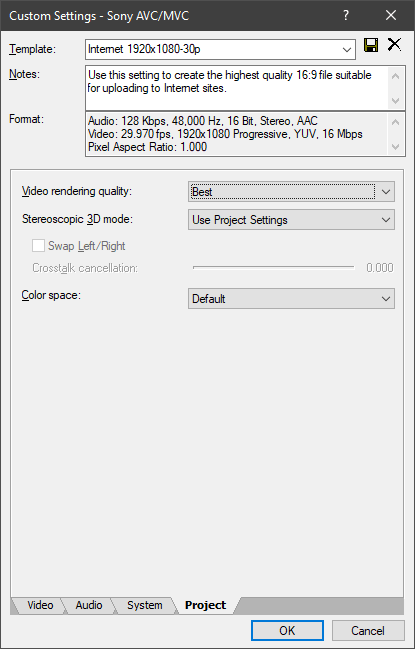
Now choose Sony AVC/MVC > Internet 1920x1080-30p. With that highlighted, click on Customise Template.

Now set the framerate to 60 fps.

And finally under the Project tab, set the Video rendering quality to Best.
When you’re ready, give the rendering template a meaningful name like YouTube Render 60fps Template. Click on the save button then the okay button.

Now click on Render to begin your first render with the new settings.

Congratulations, should should now be rendering your video.
I hope this guide has been useful. Any questions, be sure to leave a comment on my YouTube video.
Final Notes
Always remember that some quality will be lost when importing the video in to YouTube.
This is because YouTube uses compression to minimise file size for easier storage and delivery over the internet. Simply put, it helps videos to stream smoother over the internet.
Unfortunately we have zero control over how much compression is applied to our videos by YouTube.
Article Categories: # sony-vegas# youtube# tutorial
Date Published: Sep 19, 2020
Detailed Guide to Export Sony Vegas Pro file to YouTube
YouTube is by far the most popular video sharing website. There are millions of new videos posted there every day. To make personal video more attractive, many people will edit their video in Sony Vegas Pro first. But after the editing, some don't know how to export the best video for YouTube from Sony Vegas Pro.
I googled the best render settings for YouTube in Sony Vegas Pro and found there are many video tutorials in YouTube but there was few useful posts there. With digging deeply around, I found a very detailed guide in linustechtips.com shared by NonaHexa. This tutorial explains the method for preparing high definition video for posting on YouTube with clean imagery and easy-to-understand wording.
Sony Vegas Pro: Best Render Settings for YouTube
Note: This does not apply solely to Sony Vegas Pro 12, nor Sony Vegas Pro itself. These are generalized video settings as illustrated through Sony Vegas Pro's menus.
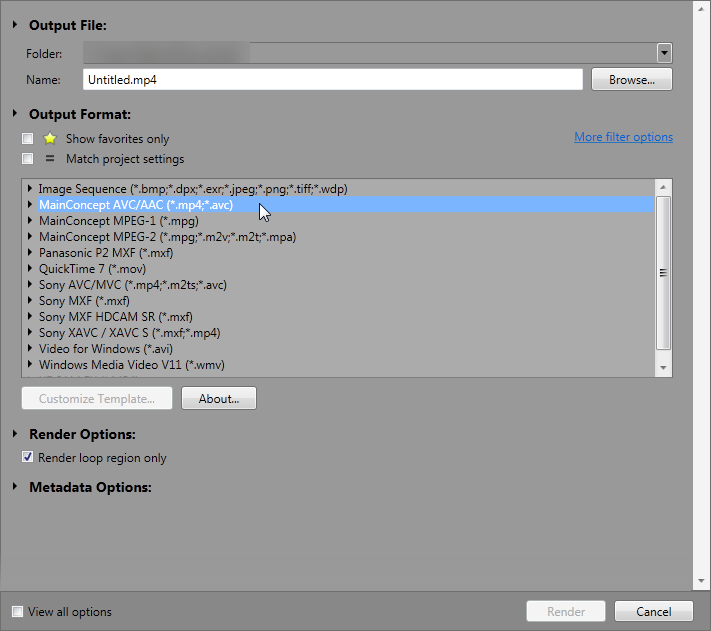
Step 1: Navigate up to the top of your Vegas Pro program, and go to File -> Render As
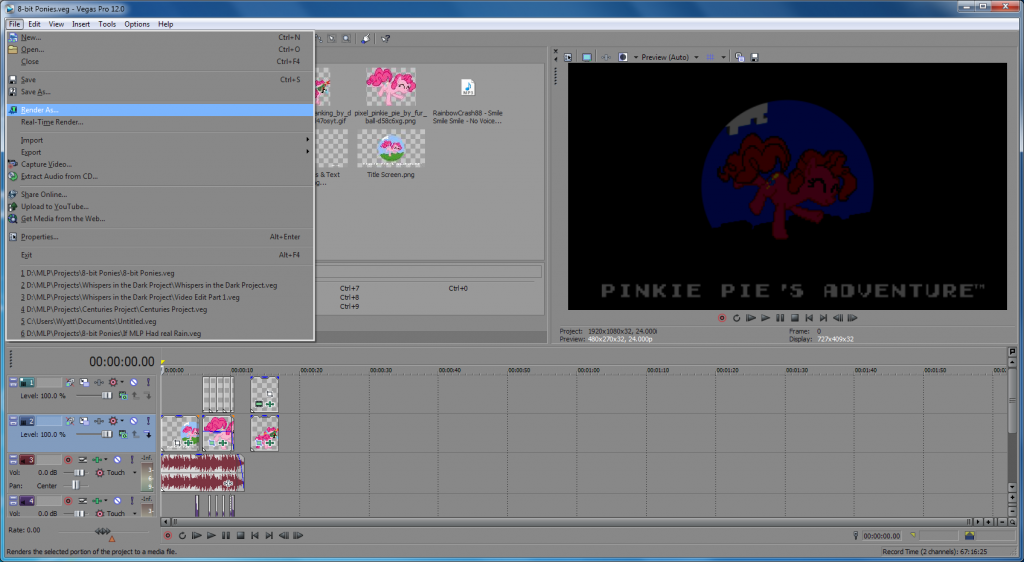
Step 2: While this may receive some flak, the H.264 codec is currently the best Render option available for Rendering videos in Sony Vegas Pro, and widely accepted as the current best overall. Navigate to the option highlighted in the menu below!
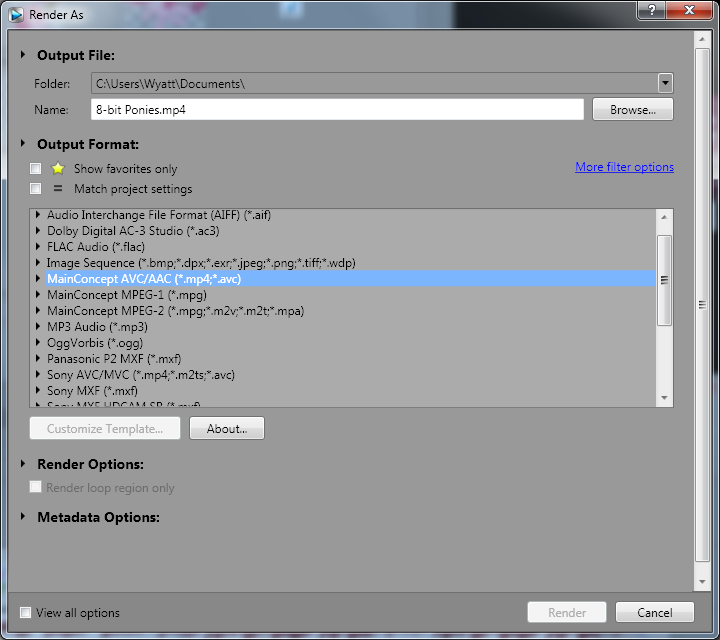
Step 3: Expand that menu, and you'll be presented with a list of presets. Don't just jump to the one that looks the most appealing though! Navigate through the list until you come across "Internet 1080p."
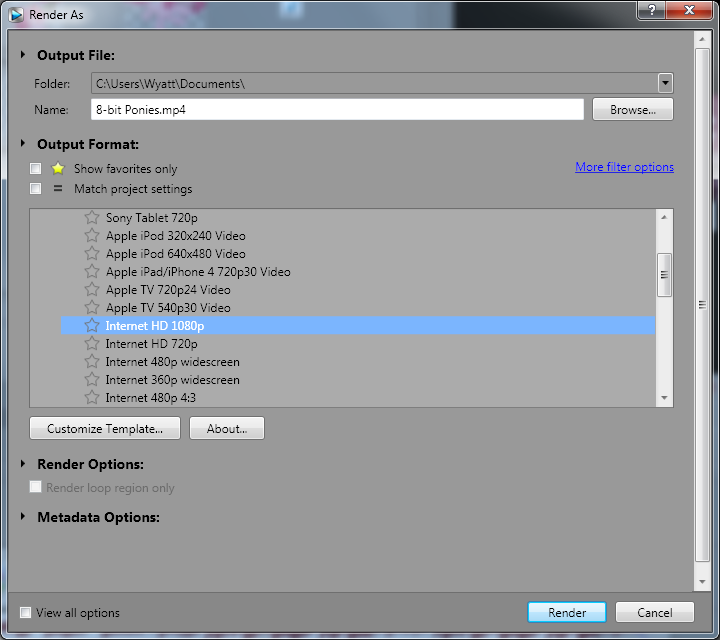
Step 4: Click the "Customize Template..." button, to bring forth a menu where we'll customize it to our liking!
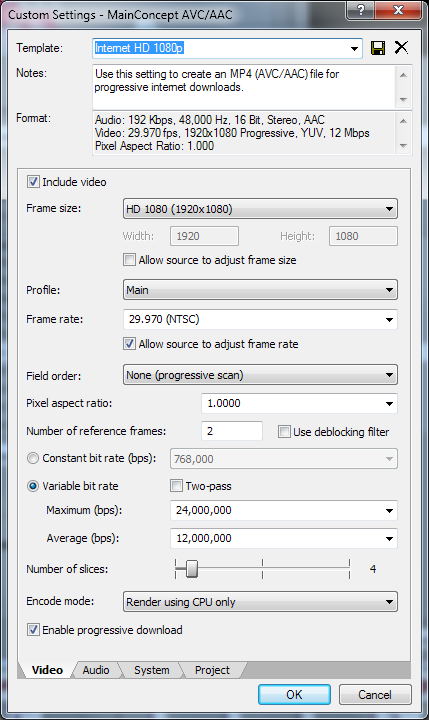
From this menu, we can see a few options we'll be changing. The resolution, the Profile, the Framerate, and the bit rate. Here's some things to note:
Your Resolution should always match, or be lower than your source footage's resolution. Never higher.
The same rule that applies to your resolution, also applies to your framerate.
For HD content, you DO NOT want Interlaced footage. Make sure that your Field Order is always Progressive Scan.
A higher bit rate equals a higher filesize. You'll be making a compromise between video quality, and filesize.
Your resolution should always be the same, or lower than your source footage. Never higher! YouTube has Native Support for 4K, so if your footage is in 4K, be sure to select it as its resolution!
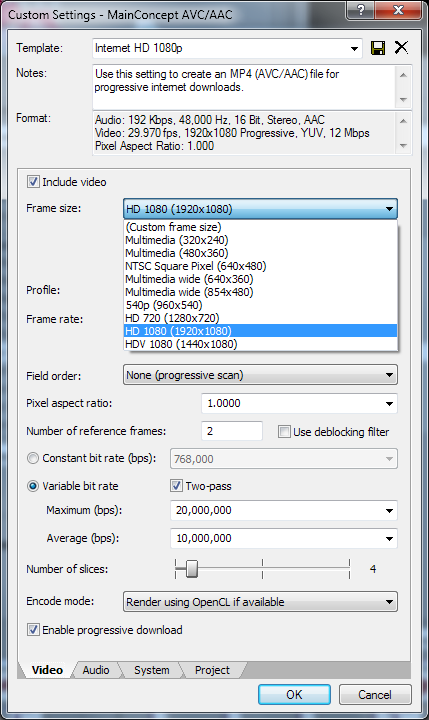
While this list does not display 4K resolution, (3840x2160) Vegas Pro does allow you to render it! Simply select "(Custom frame size)" and type in the values!
From this dropdown menu, you'll be selecting the resolution for your footage. Be sure to select an option that best matches your source!
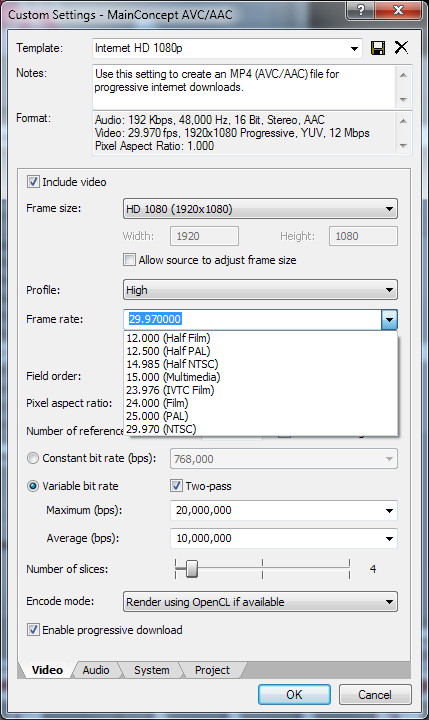
Framerate is just as important as resolution when it comes to matching your footage. Sony Vegas Pro does support 60fps renders, though it is not listed here! Unlike the custom value option for resolution, instead you'll be typing in the value in the box itself. Simply type the framerate at which your footage was recorded. "60" for FRAPS recordings at 60fps, for example.
Next is our bit rate. A bit rate is just that. A rate at which how many bits can be used per second of footage. Traditional bit rates for YouTube are 5-20mbps.
A variable bit rate versus a constant bit rate is less about which is better, and more about how much time you have and how efficient you want your render to be.
Selecting a constant bit rate of 20mbps is going to grant you a very sharp video, but with a larger filesize than would be had through a variable bit rate of 10 average and 20 maximum. A variable bit rate allows Vegas Pro to increase the bit rate for a certain bit of rendering, so as to allow for better compression when necessary, while maintaining a low filesize, due to it not being necessary to use such a high bit rate for larger blocks of similar data. (solid walls, still images and video, etc.)
More is always better with video editing, but the results are largely marginal after a point of about 50mbps. Especially for YouTube, as they do not support bit rates higher than so.
You can calculate your video's output filesize by taking your bit rate, dividing it by 8, and multiplying your number by the number of seconds. (10 / 8 = 1.25 x 180 = 225MB file for 3-minute video.)
The higher you can go, the better. Something like 20,000,000 average and 50,000,000 maximum. However, I find a good spot in the middle is something around 10,000,000 average, and 20,000,000 maximum. Around 250MB for a 3-minute video.
Step 5: So! You've got your Video Settings figured out! Audio is just as important though! Navigate over to your Audio Tab, and take a look inside there!
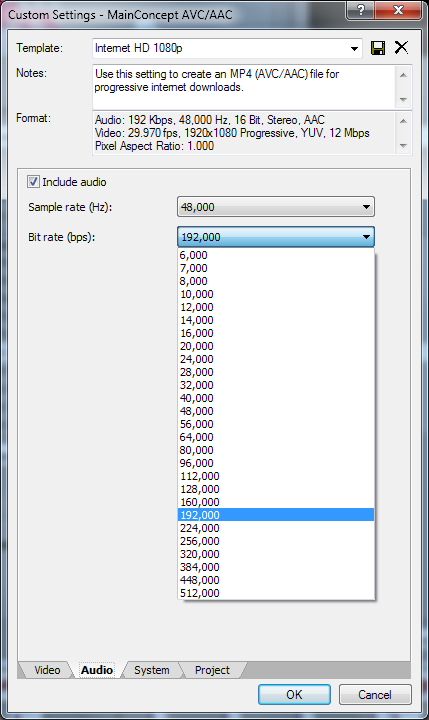
Here, you'll be able to select the Sample Rate, and Bit Rate of your audio. The best option here is to select a bit rate from the list which is closest to your source's audio. YouTube does not support audio bit rates over 320kbps however, so generally speaking this is the best option!
That's it! It really is that easy to get great, low filesize HD uploads for YouTube! These settings should transfer over between programs you use, though the interface and exact labeling might be different!
Rendering to an Interent Template does not limit you to just uploading it to a website. You can also use this format for playback on your computer.
Related Tip: How to Import YouTube Video Sony Vegas Pro?
When you download YouTube in Sony Vegas Pro supported format, you can simply load the video into SV for editing. For those Sony Vegas Pro unsupported YouTube video, you can convert downloaded YouTube video to Sony Vegas Pro supported format with third-party software.
With Pavtube Video Converter, you can convert YouTube FLV video to Sony Vegas friendly supported AVI, MOV, MP4, WMV, MPEG-1/2/4, H.264/AVC, H.265/HEVC,(Vegas Pro 14 supports HEVC) with simple 3 clicks. It also can compress YouTube 4K video to 1080p for Sony Vegas Pro if your computer is too low to handle 4K video. What's more, this video converter also can convert your Sony Vegas Pro export file to YouTube supported MP4, WebM, FLV, WMV, etc with excellent video quality if your Sony Vegas Pro exported file isn't supported by YouTube.
You also can configure video and audio parameters including frame rate, bitrate, codec and audio codec, bitrate, channel, sample rate to make the output video more compatible with Sony Vegas Pro 14/13/12/11. Furthermore, Pavtube Video Converter is also an excellent video editing tool with some simple video editing function. You can trim video, crop video, merge video, split video before export. You also can add subtitle/watermark to video files, rotate/flip video, edit audio. For Mac users, you can turn to Pavtube Video Converter for Mac to convert YouTube to Sony Vegas Pro media loading problems.
Configuring Sony Vegas Best Render Settings in Easy Steps
Video rendering is when the computer program processes the information provided from a coded data source and collaborates it to build and display an image. Or we can say that it is the process of converting the source material, in this case, a video, into the final form.
Today we will learn how to implement Sony Vegas best render settings. You will find several versions of Sony Vegas operational out there, but the render settings are almost the same for all, depending on the existing video codec. Video rendering is a hardware-intensive process. It puts to test even the best of processors and systems, hence, you must follow the right process for how to render Sony Vegas.
Best Render Settings for Sony Vegas
Before moving to the best render settings for Sony Vegas, it's important to find out the difference between real-time and advanced rendering. The distinction between them is fairly simple.
Right now, you may be reading this article on a computer, which is rendering data in real time. In other words, whatever your computer is displaying on the screen is real-time rendering. The computer processors are computing and interpreting the coded data with a remarkable speed that you won't see any lag when it displays the images, content, etc.
In advanced Sony Vegas 11 best render settings or in any other version for that matter, the software will render a video in advance because real-time rendering is not possible. For instance, when you see an animated video by Pixar or Dreamworks, they are rendered in advance. This is because the video quality is too good to be rendered in real time. Hence, the editors render the video beforehand to ensure that it plays continuously.
For great results, you need to set Sony Vegas' best render settings before giving the command.
1. Video Render
To create a high-quality and lag-free video, set the video render settings to HD 1080-60i (1920x1080, 29.970 fps). This also means that the video will be produced in 1920x1080 resolution at 29.970 frames per second.
The frame rate must be set at 60 frames per second, which is not available on Sony Vegas under default options. The closest default option available is 59.940 fps, but you can set it to 60 fps manually.
In addition to these settings, choose the following;
Render Quality - Best
Motion Blur - Gaussian
The Deinterlace Method must be configured for Blend Fields.
For Resample Mode, set it to Disable Resample.
With these video settings set, you can expect a great video quality and outcome.
2. GIF Render
You can convert a video or a small length of a video into a GIF image with the Sony Vegas GIF render. The Sony Vegas best render settings for a GIF image are 240x80 with 256 colors set as the most suitable option for rendering.
Also Read:
Best Video Settings for Twitter >>
Add Text Over Video with Sony Vegas >>
How to Resize a Video in Sony Vegas >>
How to Render on Sony Vegas
Earlier, the Sony Vegas had the Mainconcept encoder, which is still available in some of the Sony Vegas versions. But the new versions of the software come with the new Magix AVC/ACC video codec.
This codec has default templates for video render depending on the video resolution. You will find different Sony Vegas best render settings for 4K, 1080p, and 720p resolution.
The new Magix AVC/ACC video codec replaces the older version and it has been optimized to work with graphic engines including the Intel Quick Sync Video and other NVidia or AMD Radeon graphics architecture.
This means that now you can render videos on Sony Vegas by only using the Graphics card instead of the earlier CPU-only infrastructure. Here's the process for best render settings for Sony Vegas 11 and up versions.
Turning on GPU Settings
Step 1:
Before rendering videos on Sony Vegas, you need to ensure that the software has your preferred graphic settings enabled. To do this, go to Options in the main menu and navigate to Preferences, then moving to Video.
Step 2:
Under "GPU Acceleration of video processes," select your system's graphic card.
Rendering with Magix AVC/ACC settings
Step 1:
For rendering the video with these settings, open the settings menu on Sony Vegas software and select the output folder destination. This is the folder where the final video will be saved.
Step 2:
On the left side, you'll find the Format section. Click on it, and from the drop-down menu, select MAGIX AVC/AAC MP4.
Step 3:
On the left side, you'll find video output templates with pre-set video rendering settings. You can choose the preferable template. Rest assured that it can be customized according to specific requirements.
Customizing Sony Vegas Best Render Settings
Step 1:
Click on the customize template while you are working on the video settings in the "Video" tab.
Step 2:
If required, start by renaming the template and click on the Save (Floppy Disk) icon next to the name bar.
Step 3:
Next, set the frame size and frame rate. For best render settings for Sony Vegas 17. From the options available under the drop-down menus of both the parameters, choose the highest value. For frame rates, you can also customize them to make the figure 60.000 fps.
Step 4:
Move to the "Project" tab and set the "Video rendering quality" to Best.
This completes the best render settings on Sony Vegas and all its versions. While there may be some differences in the interface of the Sony Vegas version you are employing, the settings and the parameters are the same.
So, make sure to understand this process and then navigate to the right options. While exporting the rendered videos to YouTube, you may see a dip in the quality. That is not an issue of the software, but YouTube minimizes the video size for storage and viewing purposes.
Best Way to Edit and Render Video-iMyFone Filme
iMyFone Filme presents another easy and simple way to create a highly quality video without depending on the Sony Vegas best render settings. On iMyFone Filme, you need to gain access to the video play settings and adjust the video resolution plus frame rate to customize its rendering properties.
Step 1:
Import the video you want to render on Filme and check its video quality.
Step 2:
To change the output when you export the video, click on the Gear icon above the timeline, and the Play Settings window will open.
Step 3:
Here you can change the video aspect ratio, Resolution, and Frame Rate.
Step 4:
For the highest video quality, set the aspect ratio according to your requirements and change the Resolution to 1920x1080. Set the frame rate to 60 fps. Click on OK.
With iMyFone Filme, you can quickly change the video outcome by tweaking a few settings.
Editing Videos with iMyFone Filme
Besides letting you fine-tune the video quality, Filme also provides access to a ton of video editing features. While using Filme, you will find yourself surrounded by pro-quality editing tools that include cutting, trimming, adding graphics, voiceovers, etc.
Here's what you can do with Filme video editor;
From the Resources tab, you can add short videos depending on the occasion, like the one below, where we have added a short intro video.
Next, you have a wide variety of filters to add onto the videos and make it look exactly as you want. Similarly, you can also add effects to the videos.
You are free to add additional elements and transitions to the media content according to the requirements.
While these are the basic functions, some pro-level features of Filme include self voice recording, screen recorder, changing voice, changing the video quality via rendering (explained above).
All of these and many more features make Filme one of the best choices for creating bespoke videos from an easy and intuitive interface.
FAQs
1. How much time does it take to render a video?
The ETA for rendering a video depends on the video length and quality. The longer length and higher quality will extend the rendering time and vice versa. Moreover, it can also depend on the encoder you are using. When it comes to Sony Vegas best render settings, the latest MAGIX AVC/AAC codec will take less time than its previous versions.
2. Is it possible to customize audio settings along with video?
Yes, similar to changing the video settings before rendering, you can access the audio settings from the "Audio" tab next to the "Video" tab in the dialog box. With audio, you can change the format by choosing the template and also choose sample rates plus bit rate according to requirements.
Final Words
The above guide explained the process for how to render on Sony Vegas, and the same process is applicable to all the versions of the software with some changes in the interface. The purpose of rendering a video is to ensure that it runs continuously when someone plays.
The Sony Vegas best render settings means setting the most effective video playback settings. Besides Sony Vegas, you can also use Filme to change the video playback settings, ensuring the same outcome with much less steps and work.
You will find the method to render a video with both the software. Make sure to understand the entire process before making a decision.
Many of the Vegas Pro users are facing issues while rendering the video. Most people suffer from the blurry videos they get after rendering.
Here, one user is sharing his experience on Reddit.
Best render settings? from VegasPro
Don’t worry about it!
The CPU Guide brings you the best tutorial on the Best Sony Vegas Pro Rendering Settings.
Read More: Sony Vegas Pro Keeps Crashing On Windows 11/10? 7 Quick Fixes!
Tutorial: How to Render in Vegas Pro
So, in this tutorial, I will tell you the best rendering setting in Vegas pro, which will provide you with ultra-clear and full HD videos.
This tutorial will help YouTubers and streamers mainly if you belong to another platform, then little settings change will work for you.
And the upcoming settings are applicable to all Sony Vegas Pro variants.
Video Rendering Settings For PC/Windows 11/10
Video Project settings
- So firstly done with the editing of your video project
- Now right-click on the video. The small menu will appear select “Properties“
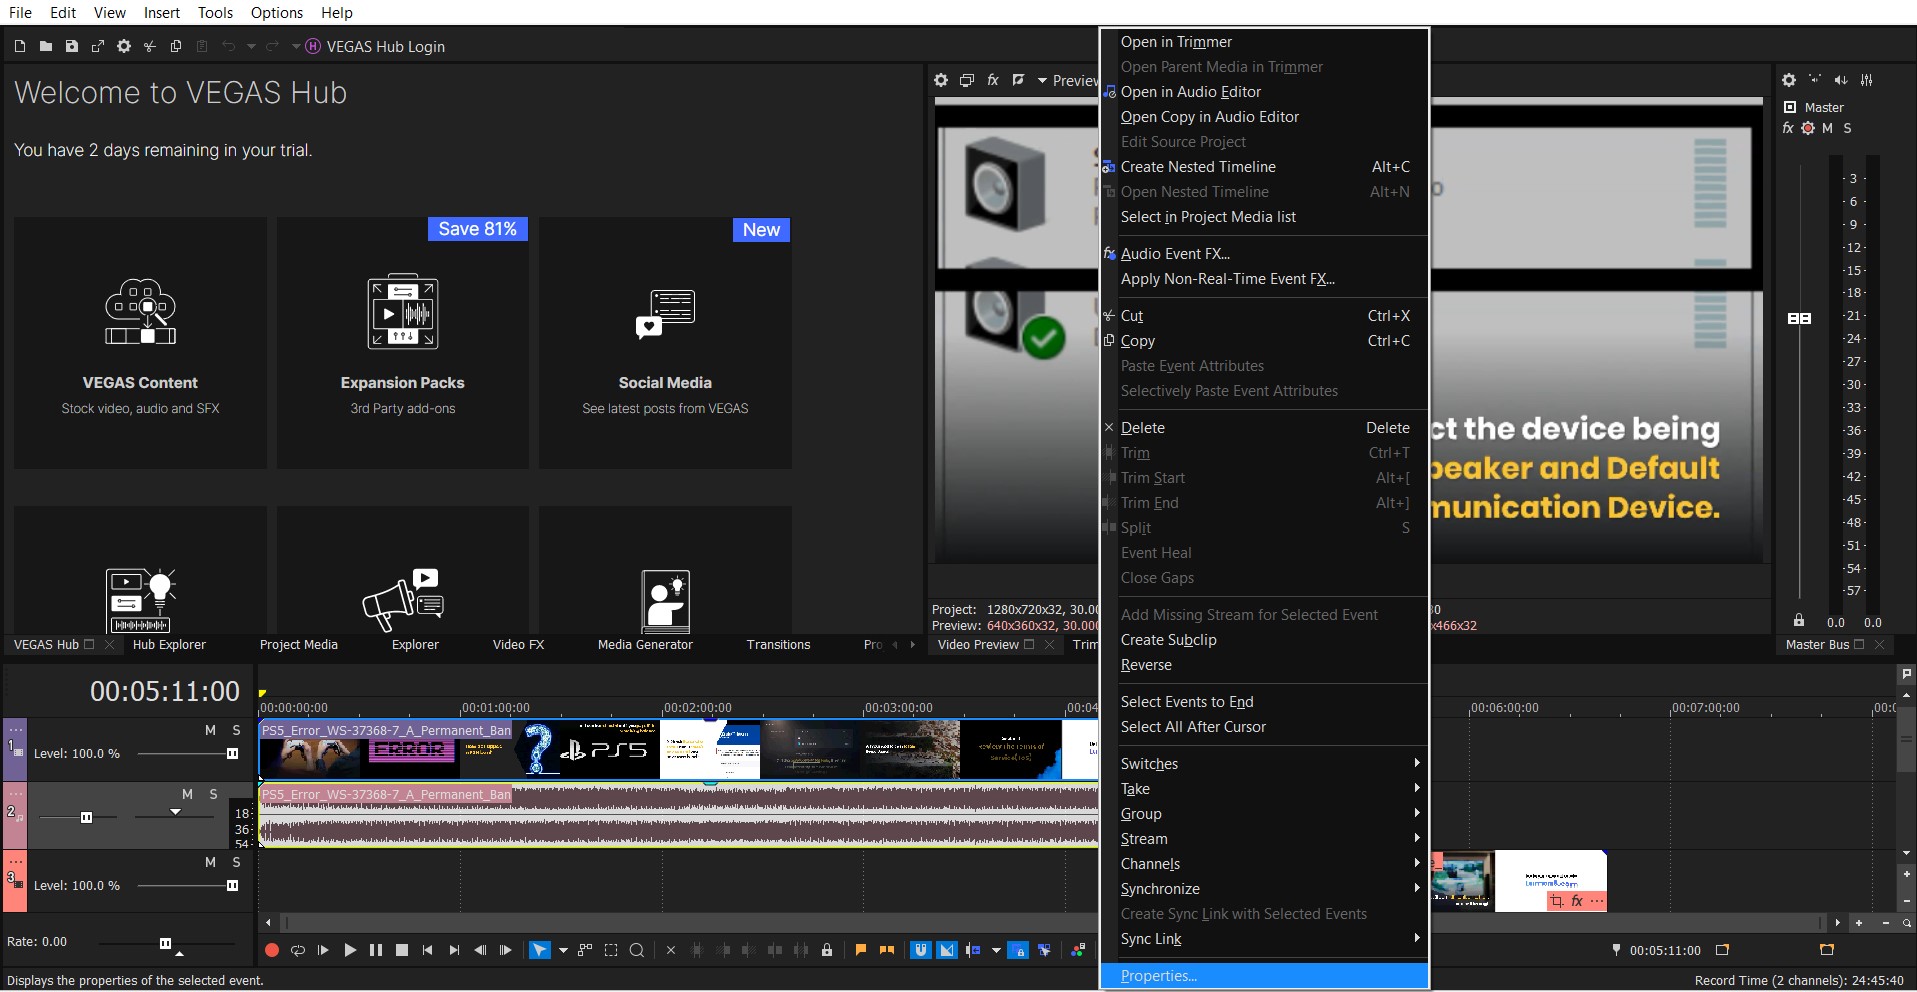
- Now select the Disable the Resample (To Avoid Blending frames together)
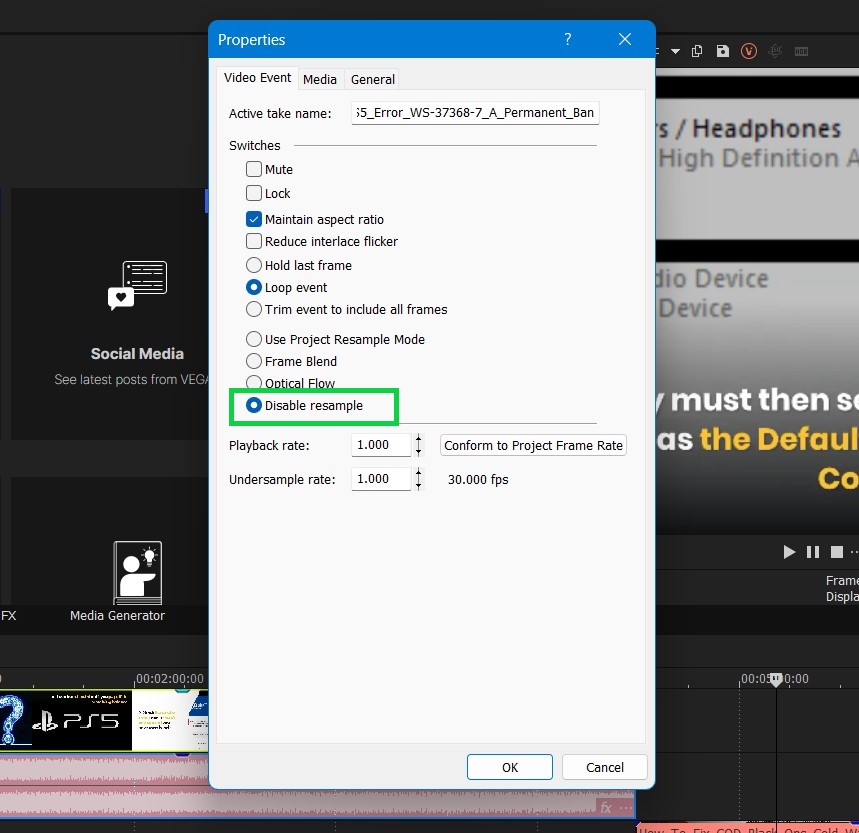
- Select the Video part you want to render and select the “Project Video properties“
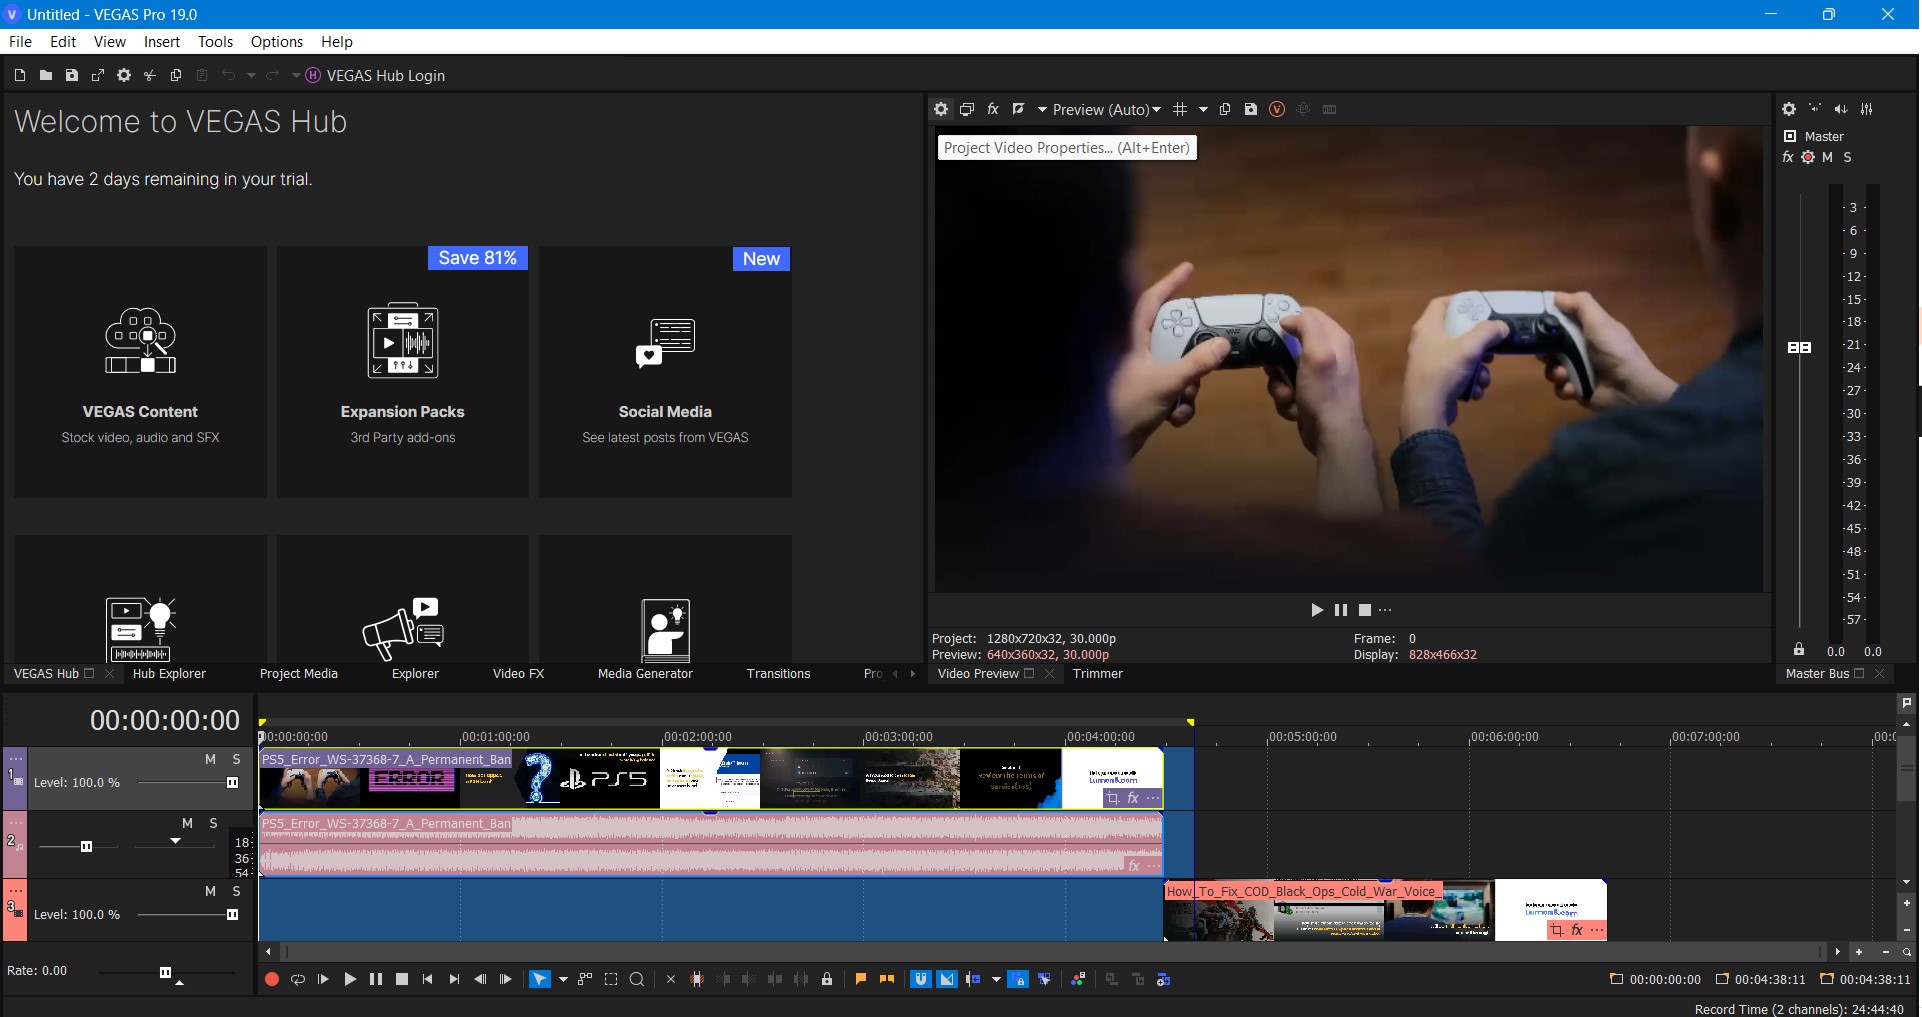
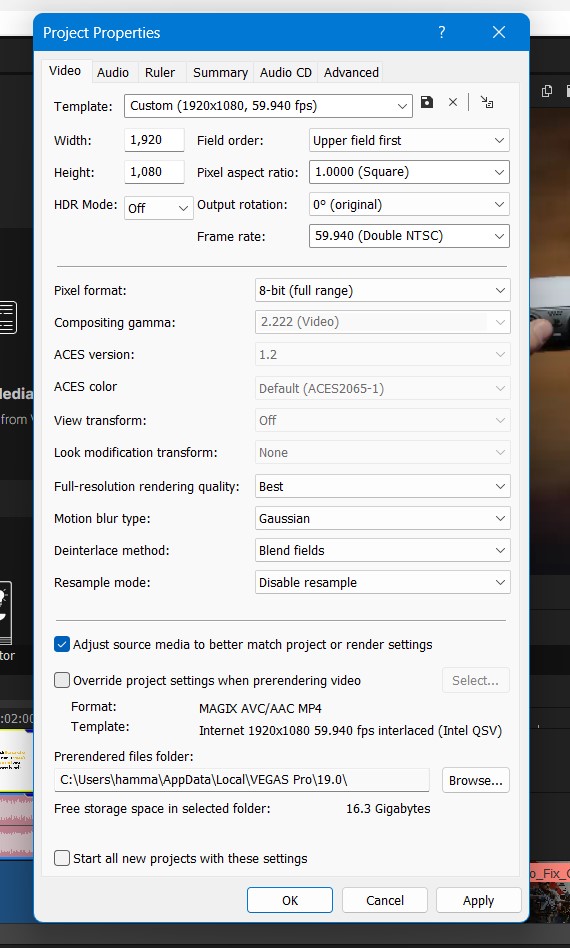
- Project Properties will open
- For Full HD video, select temple 1920×1080 with 59.940 FPS (60 FPS)
- Set Width: 1920, Height: 1080, Frame rate: 59.940 FPS
- The Pixel Aspect ratio will stay the same
- Full-resolution Rendering quality set as BEST
- Resample mode: Disable
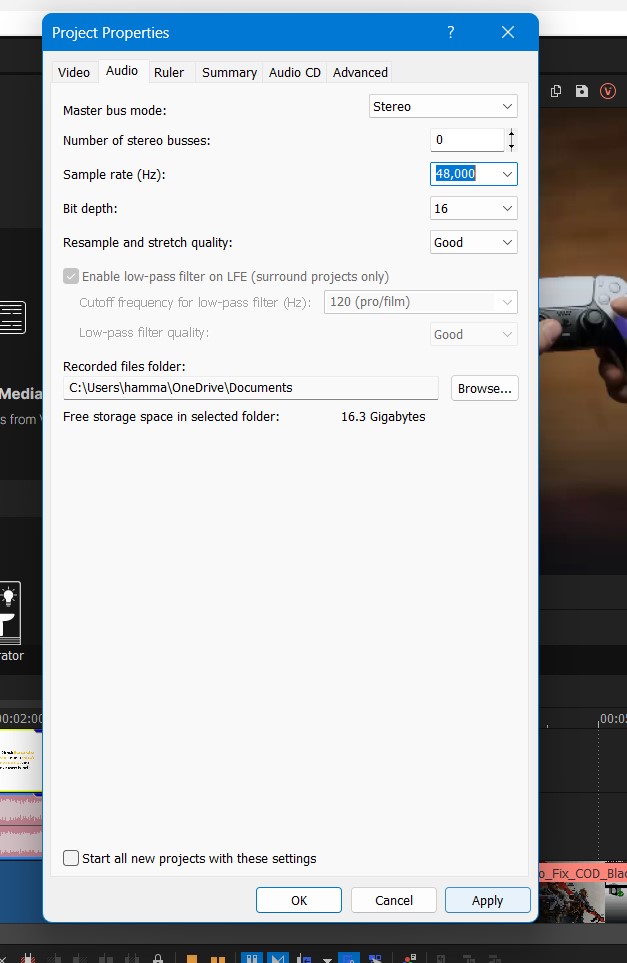
- Audio Tab
- Master bus mode set as Stereo
- Sample Rate (Hz) set as 48000
- After that select Apply and OK to save the Video project settings
Render Time
Now, after completing the above steps now it’s time to render the video. Follow the steps down below:
- On the top left corner, select the “File” button
- A small menu will appear to select the “Render As” option
![[Tutorial] Best Sony Vegas Pro Render Settings!](https://www.thecpuguide.com/wp-content/uploads/2022/06/render-as.jpg)
- Render As window will open
- Select “SonyAVC/MVC” & and in Templet select “Internet 1920 x 1080“
![[Tutorial] Best Sony Vegas Pro Render Settings!](https://www.thecpuguide.com/wp-content/uploads/2022/06/Render-as-window.jpg)
- Hit the Customize template button and Set FPS and Resolution just like in Video project settings.
![[Tutorial] Best Sony Vegas Pro Render Settings!](https://www.thecpuguide.com/wp-content/uploads/2022/06/Custom-settings.jpg-.jpg)
- Now click the Audio Tab located down below
- Set the Bit rate: 320000
- Now click Ok
![[Tutorial] Best Sony Vegas Pro Render Settings!](https://www.thecpuguide.com/wp-content/uploads/2022/06/Bit-rate-.jpg)
- You back in the main window
- Now Click on the Render
Now the rendering of your video will start and now you have to wait to get a super clear and amazing video for you.
If you want to render the videos for mobile phones like iPhones or Android Devices.
Read More: Sony Vegas Pro No Waves Audio Issue On Windows 11/10? 5 Easy Fixes!
Video Rendering Setting For iOS & Android
- So firstly done with the editing of your video project.
- Now right-click on the video. The small menu will appear select “Properties”
- Now select the Disable the Resample (To Avoid Blending frames together)
- Select the Video part you want to render and select the “Project Video properties”
- Project Properties will open
- For Full HD video, select template, 1280×1080 with 30000 FPS (30 FPS) or you can change it according to your phone model
- Set Width: 1920, Height: 1080, Frame rate: 30000 FPS
- The Pixel Aspect ratio will stay the same
- Full-resolution Rendering quality set as BEST
- Resample mode: Disable
- Audio Tab
- Master bus mode set as stereo
- Sample Rate (Hz) set as 48000
- After that, select Apply and OK to save the Video project settings
Render Time
Now, after completing the above steps now it’s time to render the video. Follow the steps down below:
- On the top left corner, select the “File” button
- A small menu will appear to select the “Render As” option
- Render As window will open
- Select “SonyAVC/MVC” & and in Templet select “Internet 1280 x 720“
- Hit the Customize template button and Set FPS and Resolution just like in Video project settings.
- Now click the audio Tab located down below
- Set the Bit rate: 320000
- Now click Ok
- You back in the main window
- Now Click on the Render
Now the rendering of your video will start and now you have to wait to get a super clear and amazing video for your iPhone and Android mobiles
Hope all the above solutions help you understand the Best Sony Vegas Pro Render Settings.
Project and render settings advice sought
Don't fancy much, your machine allows you do fullHD project only.
Take the framerate 50fps for smooth motion.
Keep the source material for a hardware revolution in coming days.
ASUS TUF Gaming B550plus Bios2803:
*Thermaltake TOUGHPOWER GF1 850W
*ADATA XPG GAMMIX S11PRO 512GB4sys + 2TB4data
*G.SKILL F4-3200C16Q-64GFX
*AMD Ryzen9 5950x + LiquidFreezer II-240
*XFX Speedster-MERC319雇佣兵-RX6900XT + AdrenalinEdition 22.5.1 (WHQL)
DPort: 2xSamsung-LU28R55 10bit4k60Hz 300cd/m²HDR10
ALC1200+AAFOptimusPack 6.0.9403.1 Analog: ROCCAT Kave 5.1Headset/Mic
ALC1200-TOSLINK: LG DSP7 Surround 5.1Soundbar
USB Input: IK Multimedia iRigKeys MIDI24
USB Device: Ultron CardReader/Writer
Windowspro 10.0.19044.2075
DirectX 12_2 Ultimate, Direct3D11Package installed
OpenGL 4.6.14800 Compatibility Profile Context Version 22.5.1 30.0.15021.11005
Vegaspro20 + Handbrake/XMediaRecode + DVDArchi7
Acidpro10 + SoundForgpro14.0.0.65 + SpectraLayerspro7
K-LitecodecPack1662 (MPC Video Renderer for HDR10-Videoplayback)
I would do 4K 25, use the the extra frames for slow motion when needed, and render 1080P25.
Dell XPS 15 laptop (2017) 32GB ram, NVIDIA 1050 (4GB) with latest studio driver, Intel i7-7700 with Intel 630 iGPU (driver 30.0.101.1994), dual internal SSD (256GB; 1TB), Windows 10 64 bit
Vegas 19.550
Vegas 20.139
Do 4k25p and render 1080p25?
You confused me @RogerS
My project does editing on timeline and I output its signal which means the render follows my project settings.
Or should I divide a schizophrenia for me?
ASUS TUF Gaming B550plus Bios2803:
*Thermaltake TOUGHPOWER GF1 850W
*ADATA XPG GAMMIX S11PRO 512GB4sys + 2TB4data
*G.SKILL F4-3200C16Q-64GFX
*AMD Ryzen9 5950x + LiquidFreezer II-240
*XFX Speedster-MERC319雇佣兵-RX6900XT + AdrenalinEdition 22.5.1 (WHQL)
DPort: 2xSamsung-LU28R55 10bit4k60Hz 300cd/m²HDR10
ALC1200+AAFOptimusPack 6.0.9403.1 Analog: ROCCAT Kave 5.1Headset/Mic
ALC1200-TOSLINK: LG DSP7 Surround 5.1Soundbar
USB Input: IK Multimedia iRigKeys MIDI24
USB Device: Ultron CardReader/Writer
Windowspro 10.0.19044.2075
DirectX 12_2 Ultimate, Direct3D11Package installed
OpenGL 4.6.14800 Compatibility Profile Context Version 22.5.1 30.0.15021.11005
Vegaspro20 + Handbrake/XMediaRecode + DVDArchi7
Acidpro10 + SoundForgpro14.0.0.65 + SpectraLayerspro7
K-LitecodecPack1662 (MPC Video Renderer for HDR10-Videoplayback)
Yes, edit at 4K 25p and render at either 4K 25p or 1080 25p.
I think if you crop in on the original video its better to have a project file with the same high resolution as your 4K footage. You can then render at the same or a lower resolution.
50p is for special effects in my opinion as it's smoother than what we are used to with cinema or television. I shoot 1080p 60fps for slow motion on a 24p or 30p timeline.
Rendering follows project settings using a tool like Voukoder but for MagixAVC you have to set it manually.
Dell XPS 15 laptop (2017) 32GB ram, NVIDIA 1050 (4GB) with latest studio driver, Intel i7-7700 with Intel 630 iGPU (driver 30.0.101.1994), dual internal SSD (256GB; 1TB), Windows 10 64 bit
Vegas 19.550
Vegas 20.139
😁😁
I see your point!
Design a flattop and transfer it to a kayak.
With an i7-3630QM @ 2.4 GHz
😰😰
ASUS TUF Gaming B550plus Bios2803:
*Thermaltake TOUGHPOWER GF1 850W
*ADATA XPG GAMMIX S11PRO 512GB4sys + 2TB4data
*G.SKILL F4-3200C16Q-64GFX
*AMD Ryzen9 5950x + LiquidFreezer II-240
*XFX Speedster-MERC319雇佣兵-RX6900XT + AdrenalinEdition 22.5.1 (WHQL)
DPort: 2xSamsung-LU28R55 10bit4k60Hz 300cd/m²HDR10
ALC1200+AAFOptimusPack 6.0.9403.1 Analog: ROCCAT Kave 5.1Headset/Mic
ALC1200-TOSLINK: LG DSP7 Surround 5.1Soundbar
USB Input: IK Multimedia iRigKeys MIDI24
USB Device: Ultron CardReader/Writer
Windowspro 10.0.19044.2075
DirectX 12_2 Ultimate, Direct3D11Package installed
OpenGL 4.6.14800 Compatibility Profile Context Version 22.5.1 30.0.15021.11005
Vegaspro20 + Handbrake/XMediaRecode + DVDArchi7
Acidpro10 + SoundForgpro14.0.0.65 + SpectraLayerspro7
K-LitecodecPack1662 (MPC Video Renderer for HDR10-Videoplayback)
I edited 4K projects with an even worse processor than that but had to make proxy files for all the 4K footage. It worked but I'm glad I upgraded computers to be able to edit 4K easily.
Dell XPS 15 laptop (2017) 32GB ram, NVIDIA 1050 (4GB) with latest studio driver, Intel i7-7700 with Intel 630 iGPU (driver 30.0.101.1994), dual internal SSD (256GB; 1TB), Windows 10 64 bit
Vegas 19.550
Vegas 20.139
4K @ 25fps and maybe smart upscale the HD footage?
Being an AI FX, does Vegas' Smart Upscale FX actually work properly with an i7-3000 series CPU? None of Vegas' AI FX worked when I was using an i7-4770 CPU powered computer.
Cameras: Sony FDR-AX100E; GoPro Hero 8 Black
Installed: Vegas Pro 16 Edit, Vegas Pro 17 Edit, Vegas Pro 18, Vegas Pro 19 Edit, Vegas Pro 20 Edit, HitFilm Pro 2021.3, BCC 2022.5.1, Mocha Pro 2022.5.1, Ignite Pro, NBFX TotalFX 7, Sound Forge Pro 16, SpectraLayers Pro 9, iZotope RX9 Advanced
Windows 11
Dell Alienware Aurora 11
10th Gen Intel i9 10900KF - 10 cores (20 threads) - 3.7 to 5.3 GHz
NVIDIA GeForce RTX 2080 SUPER 8GB GDDR6 - liquid cooled
64GB RAM - Dual Channel HyperX FURY DDR4 XMP at 3200MHz
C drive: 1TB M.2 PCIe NVMe SSD
D drive: 6TB WD 7200 rpm Black HDD 3.5"
E & F drives: 2 x 2TB Barracuda HDDs 2.5"
Upscaling FHD to 4k is to my opinion a waste of time. Depending on the ratio of 2160p25 and 1080p50 footage and seen the hardware I would rather go for a 1080p50 project/render setting and try resampling 2160p25 to 1080p50 with the new optical flow project resample setting of VP19. (better results are got with the tool https://nmkd.itch.io/flowframes , which I use frequently to get smoother motion of p25 recordings). Downscaling 4k to FHD gives excellent results.
To me smoother motion is more important than the amount of pixels.
3POINT, Theo Houben, Vegasuser since version 5 and co-founder and moderator of the Dutch Vegasforum https://www.vegas-videoforum.nl/index.php
Recware: DJI Osmo Pocket/Mavic Mini, GoproHero7Black, PanasonicFZ300/HCX909.
Software: Vegaspro365+Vegasaur, PowerDirector365, Davinci Resolve 18
Hardware: i910900k, 32GB, GTX2080super, 1920x1200 display
Playware: Samsung Qled QE65Q6FN, Philips 55PFL7108
Thank you all for your replies. Yes, I know my hardware is now old and low powered but it will soon (hopefully) be replaced when finances allow, so I would be interested in what your advice would be if I had a more powerful machine. In my case, numbers of pixels may be more important than smooth motion as I have a number of very high resolution graphics and maps that I would be using along with the video. Your advice has all been most helpful.
Laptop: Asus W.10, 64 bit, i7-3630QM @ 2.4 GHz; 16 GB Ram, Intel HD Graphics 4000 and NVIDIA GeForce GT 650M
Vegas Pro 19 (Build 643); Vegasaur Toolkit 4.0.1; ProDad Mercall v.4; HitFilm Pro Version 2021.1; Acid Pro 10; Sound Forge Pro 12;
Using the rule of lowest common factors, the most compatible and least destructive output is 1080 p25.
-- AFM, ASCAP, BMI, ACB, CMEA. Retired, I paid my Dues.
-- Film and Imaging QA / Technical & Training Certifications
Technicolor Corp., Eastman Kodak, Inc., Noritsu, Pako, Hope Industries, Gretag Macbeth, CPI, Pallas Chicago/Denver, Phototron, QMI, Royal Color.
-- Regional Music Direction / Production Credits: West Side Story (1996), The Who's Tommy (1998), Anything Goes (1998, 2000), Personals (2000), Suds (2001), Broadway Then and Now (2001), Joseph and the Amazing Technicolor Dreamcoat (2002), Fiddler on the Roof (2003), Little Shop of Horrors (2004), South Pacific (2005), Hello, Dolly! (2005), Grease! (2006), The Sound of Music (school, 2007), Jesus Christ, Superstar (2007), A Funny Thing Happened on the Way to the Forum (2008), The Fantasticks (2009), The Enlightenment (Regional Premiere, 2010)
My Vegas Articles
HDR Banding Target for Post Production
Color Management of non-sRGB Stills
60p Player Stress Test
LUT to Remove HDR10
How to Open Twitter TS Files in Vegas
Color Profile LUTS for Vegas
UPDATED ~~ Fixing the "Pale Screen of Misery" ~~
Why don't my broadcast and PVR recordings work in Vegas?
Free Video Levels Tool for Vegas
HDR to 8 Bit Grading Tip -- Reclaiming the Shadows
Monitor Calibration on the Cheap -- a Windows 10 Tutorial
New Users Please See the Tutorials First
\\\\\ Zebras in Post? \\\\\
Software Deinterlacer Shootout 2019
Wagging the Dog -- Effects of Hyperoptimal Upload Bitrates on Youtube Quality
RGB / YUV Intermediate Codec Shootout - 2018
Speaking Good Video -- a Beginner's Guide
PC to TV Levels -- A Comedy of Errors
10 Bit vs. 8 Bit Grading -- The Musical
This is Not About Grading
Seven Lossless Codecs Rendering Comparison (2011)
Posterization in Vegas
Math Quiz for Editors
Monitor and Viewing Conditions for Color Correcting (not updated yet)
Original compilation of YUV Levels resources (2011) by amendegw and jazzy (Archive, a few broken links)
A useful printer, monitor, and video levels target. 8 bit 4:4:4, 6400x3600 (16x9). Download: https://drive.google.com/open?id=1A_Ey6sbchy-5EU2jFrdOenaUwsYSnH2a
My free dual range RGB YUV grayscale and stepwedge for handoff, screens, and printers
Better Clipping Demo (using Photoshop Action)
Other Published Resources Compiled by Nick, Set, et al
How do I Get Firewire DV/HDV Capture Working?
How to Disable so4compoundplug.dll
How to Post File Properties in Vegas
How Can I Reset Vegas to Default Settings?
VEGAS PRO FAQ AND TROUBLESHOOTING GUIDES
IMPORTANT! INFORMATION REQUIRED TO HELP YOU
Set's Vegas Pro Tutorial list
Official Vegas Video Tutorials
Tested OBS Studio Settings for Vegas
Or using the rule of highest common factors which would be 2160p50.
You have to experiment if the effort is worthwhile the outcome. Personally I don't see a quality difference on my 65" UHDTV between 4k and a down scale to FHD at normal viewing distance. But I see a difference at every distance between smooth motion and none smooth motion.
3POINT, Theo Houben, Vegasuser since version 5 and co-founder and moderator of the Dutch Vegasforum https://www.vegas-videoforum.nl/index.php
Recware: DJI Osmo Pocket/Mavic Mini, GoproHero7Black, PanasonicFZ300/HCX909.
Software: Vegaspro365+Vegasaur, PowerDirector365, Davinci Resolve 18
Hardware: i910900k, 32GB, GTX2080super, 1920x1200 display
Playware: Samsung Qled QE65Q6FN, Philips 55PFL7108
I know my hardware is now old and low powered but it will soon (hopefully) be replaced
A great idea. I know its an undesired thing to do (Nnnnooooo - I don't want spend the money!!!!), but eventually it does need to happen as technology moves on and we therefore need to upgrade (unless we stop at a point in time and never upgrade from then on). Many comments on the forum in recent months has been that GPUs are super, super expensive - so it might be a good idea to consider a 'package' purchase - i.e. something from a large computer manufacturer like Dell. HP, etc who tend to get better component deals. Whether those components are agreeable to you is another question.
Please keep in mind the minimum recommended specs for Vegas Pro 19 - https://www.vegascreativesoftware.com/us/specifications/#productMenu
Cameras: Sony FDR-AX100E; GoPro Hero 8 Black
Installed: Vegas Pro 16 Edit, Vegas Pro 17 Edit, Vegas Pro 18, Vegas Pro 19 Edit, Vegas Pro 20 Edit, HitFilm Pro 2021.3, BCC 2022.5.1, Mocha Pro 2022.5.1, Ignite Pro, NBFX TotalFX 7, Sound Forge Pro 16, SpectraLayers Pro 9, iZotope RX9 Advanced
Windows 11
Dell Alienware Aurora 11
10th Gen Intel i9 10900KF - 10 cores (20 threads) - 3.7 to 5.3 GHz
NVIDIA GeForce RTX 2080 SUPER 8GB GDDR6 - liquid cooled
64GB RAM - Dual Channel HyperX FURY DDR4 XMP at 3200MHz
C drive: 1TB M.2 PCIe NVMe SSD
D drive: 6TB WD 7200 rpm Black HDD 3.5"
E & F drives: 2 x 2TB Barracuda HDDs 2.5"
Video4YouTube
This extension is no longer supported! It may not work due to changes in the Google API. Latest VEGAS Pro versions can upload YouTube videos right out of the box.
Tools > Extensions > Video4YouTube
Video4YouTube is a free plug-in for Sony Vegas Pro, which helps editors to create and upload videos to YouTube, the most popular video sharing website in the world. It automatically determines the best render settings depending on the current project template. Every day, hundreds of people use our software to upload their videos to YouTube. This proves the high quality of our product.
Key features
- Supported resolutions: 1080p, 720p, 480p, 360p
- Four quality levels: Lower, Normal, Higher, Highest
- 4:3 to 16:9 convertion
- Internet Streaming (Fast Start)
- Automatic upload to YouTube (optional)
Video4YouTube requires Sony Vegas Pro 8-13
YouTube 15-minute video limit
By default, you can upload videos that are 15 minutes long. To upload longer videos, follow these steps:
- Visit the upload page at youtube.com/my_videos_upload
- Click Increase your limit at the bottom of the page
- Follow the steps to verify your account
Preparing your project
Make sure you have installed the latest update for Sony Vegas Pro.
Always match your project settings to the media you are using to ensure the render goes smoothly and the project is rendered out to the correct format. It is very important because Video4YouTube determines the relevant rendering parameters (resolution, frame rate etc.) based on the project settings.
Go to File > Properties (or press Alt + Enter). Select the project template that corresponds to your source media, for example, HD 1080-60i. If you are not sure which template to select, click the Match Media Settings button (with the folder icon) in the upper-right corner of the Project Properties window. Navigate to one of your source video files and click Open. This selects the appropriate template for you.
Rendering for YouTube
There are four quality levels available for rendering. When performing rendering there is a trade-off between the amount of space used and the video quality of the result. Higher bit rates will look better on the screen but will also take up more space; lower bit rates won't look as good but will allow you to fit more videos on your hard drive and upload to YouTube faster.
Keep in mind that YouTube will re-encode everything you upload to their own encoding settings. Thus, the higher the quality of uploaded videos, the higher the quality of your clips on YouTube. Upon completion of uploading, you can open your video on YouTube for viewing. It is possible that you will see a video that had not yet been fully transcoded into all possible formats, and only a lower-quality transcode will be available. It does take time to finish all possible transcodes.
Depending on your connection speed and the size of the video, it can take anywhere from a few minutes to several hours to upload a video. Depending on site traffic, your clips can take several hours to show up in the search index after they have been uploaded. Please be patient - the video will show in the search index shortly. To bypass this time, you may want to send your friends the link of the video via email or private message.
Preparing for Internet Streaming (Fast Start)
The main problem with the Sony AVC renderer (which Video4YouTube uses to create files for YouTube) is that it produces MP4 files that don't work well on the Web. They are not progressively stream. The entire video must be completely downloaded before it starts to play. To avoid this problem, the movie files must be 'flattened', which means that the file resource is placed at the beginning of the file. This is especially important if you want to host your videos on your own website.
Fast Start is a feature that enables users to watch the movie as it's being downloaded (long before the whole movie has been downloaded) from a website. It ensures high-quality playback regardless of the users' Internet connection speeds. Video4YouTube can automatically 'flatten' the movies with MP4Box tool.
Other free extensions for Sony Vegas Pro
Current Version: 1.4
Download

Thematic video
*BEST* Render Settings for Gaming Videos! (Vegas Pro 16) [Updated November 2020] ';} ?>
0 Comments