
watch the video
GST Setup and Setting for New Company in TallyERP9How to use GST in Tally ERP 9?
GST has been implemented since July 2017, which has brought a whole new era in the indirect tax regime. Since it is different from the previous laws, GST is treated differently and every person concerned with this change will have to adapt to these changes. One such change goes in the accounting of this system. Developers have customised Tally ERP 9 with GST so that users can easily get their accounting done and get desired reports at the click of a button. So let us know about several features offered by Tally ERP 9 for GST purposes in the GST tally PDF.
Company Creation in Tally ERP 9
The first step for accounting in tally ERP 9 is the creation of a company in the software. After a company is created, one can set the conditions for accounting and then do their accounting easily. So let us look at the steps of company creation and make tally GST notes for easy understanding.
Step 1: In the Gateway of Tally, click ALT F3 for getting into the Create Company screen.
Step 2: Enter basic details like tally erp 9 gst setup name of the company, mailing name, address, country, state, pin code, contact details, books and financial year details, etc.
Details to be filled in company creation:
A. Directory- This is the location on your device where all the company's data you have created in tally will be stored. By default, the link will be inside the installation folder.
B. Name- This is the name of your company.
C. Primary mailing details-
- Mailing Name- Here you have to type the name of the company.
- Address- Enter the complete address of your company.
- Country- Enter the name of the country where the business operations are being carried out.
- State- Mention the name of the state where the company would comply with the laws.
- Pincode- Mention the Pincode of the location of the office.
 D. Contact details-
- Phone No.- Mention the contact number of the office.
- Mobile No.- Mention the mobile no. of the person responsible for managing the accounting data.
- Fax No.- Mention the fax no. where any data could be received or sent.
- Email- Mention the official email Id of the company where communications can be made.
- Website- Mention the company’s website, if any.
E. Books and financial year details-
- Financial year begins from- Mention the year in which you want to create the company.
- Books beginning from- Mention the dates Xara Photo & Graphic Designer 18.0.0.61670 Crack + Keygen {2021} in the middle of the financial year or companies migrating from Manual Accounting to Tally ERP 9.
F. Security Control-
- Tally Vault password (if any)- One can opt for creating a password for security reasons. When one creates a password, tally also has the feature to show the strength of the password where the green colour indicates a strong password. But once you set a password, and if you forget it, then data cannot be retrieved.
- User security control- This tab enables control over the use of data by specific users. Only the person assigned the task can do it with a user ID and password.
G. Base Currency Information-
- Base Currency symbol- The currency is auto-populated based on the origin of the country selected.
- Formal Name- This is the formal name of the currency
- Suffix symbol to amount- You can add Rs., INR or ₹ in case of Indian currency or change as per your requirements and specifications
- Add space between amount and symbol- You can choose ‘yes’ or ‘no&rsquo.
- Show amounts in millions- If you select ‘yes,’ all figures will be displayed in millions and if you select ‘no,’ normal figures will be displayed.
- Number of decimal places- If you want to add decimals, you can select accordingly.
- Word representing the amount after a decimal- This is the name given to amounts after the decimal. For example in India it’s paisa and so on.
- Number of decimal points for the amount in words- You can add or skip as per your convenience.
Step 3: In the ‘maintain field’, tally erp 9 gst setup, select ‘Accounts Only’ or ‘Accounts with Inventory’ as per the specification of the company’s requirement.
Step 4: Press ‘Y’ to accept and save.
Below is the image of the company creation screen for reference.

In this way, a company is created in tally and GST features need to be activated for accounting, as discussed in the next topic.
Also Read: Latest GST News, Information, Notifications & Announcements
Activate GST features in Tally ERP 9
It is essential to make sure that accounting specifications are set for GST on Tally ERP 9. So let us look at the steps on how to activate GST features.
- In the ‘Gateway of Tally’, go to ‘F11: Features’ then select ‘F3: Statutory & Taxation.
- In the ‘Enable Goods and Service Tax (GST): Select ‘yes&rsquo. After selecting yes, another screen will pop up for details such as state of registration, type of registration, GST Number, etc.
- Press Y to save

After all the activation is done, you can do GST entry in tally easily.
Activate GST for Regular dealers
Most of the dealers in GST are regular taxpayers. Let us have a look at the features for activating GST on tally for them.
Step 1: In the ‘Gateway of Tally’, go to ‘F11: Features’ then select ‘F3: Statutory & Taxation&rsquo.
Step 2: In the ‘Enable Goods and Service Tax (GST): Select ‘Yes&rsquo.
Step 3: In ‘Set/Alter GST details’, select ‘Yes&rsquo. After selecting ‘yes’ a new screen will pop up for entering GST details.
Step 4: In the ‘State’ option, select the state which was selected for creating a company for identifying interstate or intrastate. The state can be changed in the GST details and a warning message will appear when the state changes.

Step 5: Set ‘Registration type’, select ‘Regular’.
Step 6: In the option ‘Assessee of Other Territory’, select option ‘Yes’, if the company is located in an Exclusive Economic Zone
Step 7: Input ‘GST Applicable from’ date and GST will be charged for those transactions
Step 8: Mention ‘GSTIN/UIN’ of the business.
Step 9: Select the periodicity of GST returns- monthly or quarterly.
Step 10: Select ‘e-way bill applicable’ to ‘yes’ or ‘no’ as applicable and select value for ‘Threshold limit includes&rsquo.
Step 11: Few states have additional features. Select if applicable. Example- Kerala has tally erp 9 gst setup flood cess applicable’
Step 12: For the option, ‘Enable tax liability on advance receipts’ choose ‘Yes’ for calculating the tax on advance receipts. By default this option is disabled.
Step 13: For the option, ‘Enable tax liability on reverse charge (Purchase from unregistered dealers)’ choose ‘Yes’ for calculating the tax on reverse charge on URD purchases. By default this option is disabled.
Step 14: In the ‘Set/alter GST rate details?’ tab, tally erp 9 gst setup, enable to enter the details.
Step 15: In the ‘Enable GST Classification?’ tab, select ‘Yes’ to create and use the classifications in the GST Details screen.
Step 16: In the ‘Provide LUT/Bond details?’ tab, select ‘Yes’ and enter the period of validity
Step 17: Press Enter to save.

We hope you have understood the steps for the activation of normal taxpayers. Now let us look at the steps for activating features in the case of composition dealers of GST for tally functionality.
Also Read: 7 Ways Goods and Service Tax benefits the Economy
Activating GST for Composition Dealers
In GST, certain persons are registered as composition dealers. They have to pay tax as a percentage of the turnover without any GST credit. Let us look at how to activate GST in Tally ERP 9 India for Composition dealers.
Step 1: In the ‘Gateway of Tally’, go to ‘F11: Features’ then select ‘F3: Statutory & Taxation&rsquo.
Step 2: In the ‘Enable Goods and Service Tax (GST): Select ‘Yes&rsquo.
Step 3: In ‘Set/Alter GST details’, select ‘Yes&rsquo. After selecting ‘yes’ a new screen will pop up for entering GST details.
Step 4: In the ‘State’ option, select the state which was selected for creating a company for identifying interstate or intrastate. The state can be changed in the GST details and a warning message will appear when the state changes.

Step 5: Set ‘Registration type’, select ‘Composition&rsquo.
Step 6: In the option ‘Assessee of Other Territory’, select option ‘Yes’, if the company is located in an Exclusive Economic Zone
Step 7: Input ‘GST Applicable from’ date and GST will be charged for those transactions
Step 8: Mention ‘GSTIN/UIN’ of the business.
Step 9: In ‘Tax rate for taxable turnover’, the rate will appear 1%. If the registration type is changed from Regular to Composition, you can change the date of applicability.
Step 10: Select ‘Basis for tax calculation’ based on the business type. For outward supplies, the total of taxable, exempt and nil-rate will be considered as Taxable Value. Inward supplies in reverse charge will be considered as Taxable Value.

Select ‘L: Tax Rate History’, to get Tax Rates with the applicable from date and basis of calculation.

Step 11: Select ‘e-way bill applicable’ to ‘yes’ or ‘no’ as applicable and select value for ‘Threshold limit includes&rsquo.
Step 12: Few states have additional features. Select if applicable. Example- Kerala has ‘Kerala flood cess applicable’
Step 13: For the option, ‘Enable tax liability on advance receipts’ choose ‘Yes’ for calculating the tax on advance receipts, tally erp 9 gst setup. By default this option is disabled.
Step 14: For the option, ‘Enable tax liability on reverse charge (Purchase from unregistered dealers)’ choose ‘Yes’ for calculating the tax on reverse charge on URD purchases. By default this option is disabled.
Step 15: In the ‘Set/alter GST rate details?’ tab, enable to enter the details.
Step 16: In the ‘Enable GST Classification?’ tab, select ‘Yes’ to create and use the classifications in the GST Details screen
Step 17: In the ‘Provide LUT/Bond details?’ tab, select ‘Yes’ and enter all my movies review period of validity
Step 18: Press ‘Enter' to save.
You would have found the activation features of composition dealers quite easy with thetally GST tutorial PDF. Now, the next step involves the creation of a Ledger before accounting.
How tally erp 9 gst setup create Ledgers in Tally ERP9 with GST?
After activating features, you need to create ledgers for passing entries in Tally with GST. So let us have a look at the steps for creating ledgers.
Step 1: In the ‘Gateway of tally’, go to ‘Accounts Info&rsquo. Then in ‘Ledgers’, select ‘Create&rsquo.


Step 2: Create Ledgers like Sales, Purchases, IGST, CGST, SGST, UTGST, stock item names, etc.
Step 3: Select the group to which the ledger belongs like IGST, tally erp 9 gst setup, CGST, SGST, UTGST will go under ‘duties and taxes.

Step 4: Enter other relevant details and press ‘Y’ to save.
After creating the ledger and activating features, you can pass accounting entries under Accounting Vouchers as per ERP 9 PDF.
Also Phpmaker 2020 Activators Patch of GST in India - What is CGST, SGST and IGST?
Conclusion
Tally has provided user-friendly ways for making accounting easy. You can also look at the implementation of GST in Tally ERP 9PDF for better clarity. One can also generate GST returns from Tally ERP with functionalities provided in tally. Thus, all such functions of GST Tally ERP 9 are an ideal accounting software package.
You can use Biz Analyst, an easy to use mobile application synced with Tally to start your journey on GST Tally ERP 9.
To keep a record of all your business transactions, tally erp 9 gst setup, you need to first create a company in Tally.ERP 9. Through the company, tally erp 9 gst setup, you can also view and update all your transaction entries, tally erp 9 gst setup, as needed, and go through the financial reports based on the transactions that you maintain.
Creating a company in Tally.ERP 9 is a simple, one-time activity. The company data created can be modified, exported, and other company data can be imported into your company at any given point of time.
To create the company, just enter the company name, address and other details, such as financial year, security. Once you have created your company, based on your business preferences, you can use the accounting, inventory, payroll, and taxation features. You can also specify the tax registration details as applicable, such as GST, TCS, or TDS, which can be accounted for your transactions.

Once you have set up your company in Tally.ERP 9 based on your business requirements, you can record and manage your day-to-day transactions, and track them – even remotely.
Assignment:
Swayam Sales is one Departmental Store in Balasore, Odisha, with GSTN No – 21AGHPB2764P1ZD deals with both Whole selling & Trading of different types of Products like … Electronics, Electrical Home Appliance, Mobiles etc. etc. with the following information’s and will maintain his Books of Accounts with the help of Tally.ERP9 Accounting Software with effect from 01-04-2020.
Swayam Sales
Balasore, Odisha – 756001
GSTN – 21AGHPB2764P1ZD
Mob – 9437264738
Website : www.tallyerp9help.com
1. Company Creation in Tally.Erp9 :
You tally erp 9 gst setup create a Company profile by using the following procedure :
1. Gateway of Tally.ERP 9 → Create Company (from opening screen)

2. Gateway of Tally.ERP 9 → Alter ( Alt+F3) → Create Company
It provides the following screen:

Directory :
modify the data path, if required.
Primary Mailing and Contact Details :
The correspondence details of your company such as mailing name, address, state, and Pin code, telephone number, email ID, and so on can be entered here.
- Select the country for which you require the statutory features in the field Country
- Base currency symbol is enabled in accordance with the country selected.
Books and Financial Year Details:

- Financial year begins from : Tally.ERP 9 pre-fills this field based on the date settings of your computer and the Country selected in the Company Creation screen.
For example, if your computer date is set to 06-06-2020 and the region is set to India, the financial year is pre-filled as 01-04-2020.
- Books beginning from : By default, Tally.ERP 9 fills this field with the Financial year begins from date. You can update this, as needed.
For example, you started to maintain your Books of Accounts in Tally.ERP9 from 1-June-2020, tally erp 9 gst setup. You can update the Books beginning from date to 1-June-2020, while the financial year will be 1-Apr-2020.
Security Control :
This is optional. You can enable security features such as TallyVault and User controls for your company anytime later.

a) TallyVault Password : If you don’t want to display your company name in Tally.ERP 9 while selecting the company, you can specify a TallyVault password for your company. You can access this company only if you know this password.
b) Use Security Control : You can allow authorised user access to your company by setting up a username and password for the company. Which means, next time you select the company, you will need to provide this username and password to open the company data. For different users, you can set up different user credentials for controlled access of your company.
| Note:The administrator password is case-sensitive, and if forgotten, it cannot be retrieved. Once Security Control is enabled in the Company Alteration screen, the fields against Password and Repeat password will display a single star. |
c) Use Tally Audit features : Tally Audit allows the administrator or an auditor profile user to track changes in accounting information.
d) Disallow opening in educational mode : Set this option to Yes , if tally erp 9 gst setup do not want the company to be opened in the educational mode. In the educational mode, you can record transactions only on the first and last day of a month.
Base Currency Information :
Base Currency Information varies based on the country selected. The various fields under this section include:

- Base currency symbol : The currency symbol of the respective country selected appears in this field.
- Formal name : The name of the currency specified.
- Suffix symbol to amount? : For countries which specify the symbol after the amount (value) – this option can be enabled. For example , Yen is specified after the amount (5000 Yen).
- Add space between amount and symbol? : Enable this option if you require space between amount and symbol.
- Show amount in millions? : This is useful for companies, which require reporting the financial statements in millions.
- Number of decimal places : This is set to 2, by default. However, it can be specified up to 4 places.
- Word representing amount after decimal : The name of the decimal portion of amount appears based on the country selected. For tally erp 9 gst setup , if India is selected as the country and Number of decimal places is entered, tally erp 9 gst setup, then paise appears by default.
- No. of decimal places for amount in words : You can specify the number of decimal places for printing the amount in words. This number should be equal to or lesser than the number specified in field No. of decimal places for amount in words
Finally, confirm company creation by pressing the ENTER key/ “Y” key to accept all declaration for the Company. The Gateway of Tally screen appears as shown below:

(Now you will be able to work with the Current Company)
2. Opening (Loading) the Company in Tally.ERP9
Once you have created a company, you can load/open the company in one of the following ways:
Select the company
- Open Tally.ERP 9 > Select Company > and select the company from the List of Companies .
Configure Tally.ERP 9 :
If you wish Tally.ERP 9 to load the company whenever you open Tally.ERP 9
1. Gateway of Tally > F12 (Configure) > Data Configuration .
2. Set Load companies on start-up to Yes .
3. Select companies to preload on start-up : You can select one or more companies to get loaded based on your choice, when you open Tally.ERP 9 next time onwards.
The first Screen is called tally erp 9 gst setup of Tally.ERP 9.
Gateway of Tally is the screen that appears on selecting a company. The Gateway of Tally menu differs based on the type of company selected. An Accounts Only Company has a different Gateway tally erp 9 gst setup Tally menu from that of an Accounts-with-Inventory Company.
The Gateway of Tally menu of a company appears as shown below:

Main Area (Ctrl+M)
The Main Area is separated into the following two areas:
>> Left-hand side area
>> Right-hand side area
The left-hand side area in the Main Area provides information of Current Period, Current Date and List of Selected Companies and Date of Last Entry.

In the right-hand side, you get more detail information on the Company. The Company information menu consists of the following:
1. List of activated Company (Company already created)
2. Masters (for defining Ledger, Group, Sub-group, Inventory)
3. Utilities like Import or Export of Data and Banking features
4. Transactions/Voucher Entry (Recording Transactions)
5. Reports (Viewing the Balance Sheet, P&L and other Reports)

Button Bar.

3. Modification Delete Company in Tally.Erp9
If your company address, phone number, or any other contact information was not provided earlier or has changed, you can update such details in Tally.ERP 9. Any changes made to these details will be reflected accordingly in your reports and printed invoices.
1. Gateway of Tally > press Alt + F3 (Cmp Info) > Alter .
2. In the Company Alteration screen, make the necessary changes.
3. Accept the changes. As always, press Ctrl + A to save.
If you do not need the company anymore, you can delete the company as well by pressing Alt+D in Company Alternation mode screen.

Click Yes.

Press Enter to delete the Company.
| Note: Deletion of a company is irreversible. The company will be permanently deleted from the system. |
4, tally erp 9 gst setup. Shut (Close) a Company in Tally.ERP9
1. Go to Gateway of Tally > Alt + F1: Shut Company .
2. Select company from the List of Primary Companies .
3. Press Enter to shut the company.

5- Activate GST for Your Company in Tally.ERP9
To use Tally.ERP 9 for GST compliance, you need to activate the GST feature, tally erp 9 gst setup. Once activated, GST-related features are available in ledgers, stock items, and transactions, and GST returns can be generated.
GST Registrations are of two types…
1.GST Regular Scheme ( for Regular Dealer)
The GST regular scheme is tally erp 9 gst setup the general taxpayers whose turnover is above the threshold limit.
Under the GST regular scheme, all individuals with turnover above 40 lacs are required to take GST Registration. They are required to pay GST on goods & services as per the applicable rates and do regular GST return filing
2. GST Composition Scheme ( for Composite Dealer)
The composition scheme is meant for small businesses whose turnover of taxable goods not more than₹1.5 crores, where GST has to be borne by the seller @1% of such turnover by traders, @2% bymanufacturers, 5% for Restaurants & 6% for Service Providers.
A Composition Dealer has to issue Bill of Supply. They cannot issue a Tax Invoice. This is because the tally erp 9 gst setup has to be paid by the dealer out of pocket. A Composition Dealer is not allowed to recover the GST from the customers.
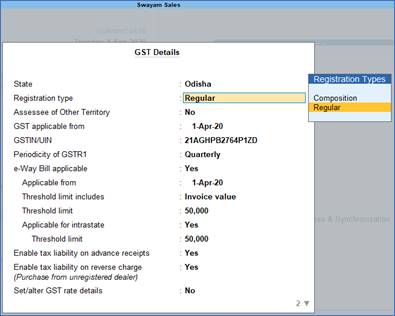
(A) Activate GST for Regular Dealers
1. Open the company for which you need to activate GST.
2. Press F11 > F3 .

3. Enable Goods and Services Tax (GST) – Yes .
4. Set/alter GST details – Yes . The GST Details screen appears.

5. State – shows the State name as selected in the Company Creation screen. This helps in identifying local and interstate transactions according to the party’s state.
6. Set the Registration type as Regular .
7. You can keep the rest default fields as same and don’t change ( but you can change as per your requirements)
(B) Activate GST for Composition Dealers
1. Open the company for which you need to activate GST.
2. Press F11 > F3 .
3. Enable Goods and Services Tax (GST) – Yes .
4. Set/alter GST details – Yes .
5. The State field helps in identifying local and interstate transactions according to the party’s state. If you change the state here, the company tally erp 9 gst setup will get updated.
6. Set the Registration type as Composition .
7. Based on your business type, select the Basis for tax calculation .
[ For outward supplies, the total of taxable, exempt and nil rated will be considered as the Taxable Value .
For inward supplies, the total value of purchases made under reverse charge will be considered as the Taxable Value . ]

You can record transactions using the ledgers with GST details, and print invoices with GSTIN.
The main concept of Trading activities are receipt of goods and delivery of goods. We generally call them PURCHASE or SALE activities. The trading items can be RAW MATERIAL, FINISHED GOODS, SEMI-FINISHED GOODS, etc. For better Organization you can use the group and sub-group for classification of the trading item.
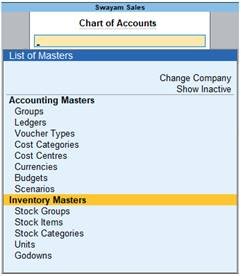
Inventory Master from Chart of Accounts :
- Gateway of Tally > Chart of Accounts
68
You can create the inventory from this menu, which contains the following options :
- Stock Group : Create your group here, for example, Raw Materials, Work-in-progress, Finished Goods, etc.
- Stock Items : Create your Stock Items here, for example, TV, Sound System, VCD, etc.
- Unit of Measurement : Create your measurement Unit for Items, for example, LTR. MTR, PCS, BOX etc.
Before creating the Inventory info menu we should know what stock groups, stock items and units of measurement are.
What are Items, Groups and Units ?
Stock Items :
Stock items are the primary inventory entity, like Ledgers. Usually it means Item or Product, which can be buying, selling or issue for production purpose. Each item is required to be accounted for, and receipt or issue needs to be created. In fact, you will create a stock ledger account for each item and TallyPrime calls this account “Stock Item”.
Stock items are goods that you manufacture or trade (sell and purchase). It is the primary inventory entity. Stock Items in the Inventory transactions are similar to ledgers being used in accounting transactions.
1. Gateway of Tally > Create > type or select Stock Item > and press Enter.
Alternatively, press Alt+G (Go To) > Create Master > type or select Stock Item > and press Enter.

76
2. Name & alias: As in other masters, you can specify multiple aliases for the stock item.
3. Under: Select Primary or an existing Stock Group. If you have not created any Stock Group, you can create one in TallyPrime to assign to the stock item.
As always, press Alt+C, to create a master on the fly. Alternatively, press Alt+G (Go To) > Create Master > type or select Stock Items > press Enter.
4. Units: Select the unit of measurement applicable for the stock item. If the unit is not listed, you can create the unit of measurement in TallyPrime to assign to the stock item.
As always, press Alt+C, to create a master on the fly. Alternatively, press Alt+G (Go To) > Create Master > type or select Units > press Enter.
5. Statutory Details: Set the applicable Taxability option for the stock item under Statutory details, The option will depend on the option enabled in the F11 (Features) screen. Click here to see more.
6. Opening Balance: Specify the opening balance for the Stock Item as on the date of Beginning of Books.
Quantity: Specify the stock item Quantity.
Rate: Specify the stock item Rate.
Value: TallyPrime automatically calculates the value by multiplying the Quantity and Rate. You can also edit the value, TallyPrime automatically refreshes the Rate field accordingly.
7. Accept the screen. As always, press Ctrl+A to save.
1. Setting GST Details in Stock Item ( Tax On Value) in TallyPrime
If GST is enabled, set GST Applicable to Applicable and enter the GST details by enabling the option Set/alter GST Details to Yes. You will get the window of GST Details for Stock Item as below:

77
Taxability :
Select Taxable for goods and services that are classified as taxable type of supply under GST. Select Exempt , if the type of supply is exempted from tax under GST, or select Nil Rated , if the tax rate applicable to the type of tally erp 9 gst setup is 0% under GST.
Integrated Tax :
When you enter the integrated tax, state tax and central tax are calculated as half of the integrated tax specified. You can change state tax or central tax, and manage other GST details by using F12 configuration.

78
Press Ctrl+A to save.
7. Specify the avs video editor patch file download Free Activators of Opening Balance , if any, for the Stock Item as on the date of Beginning of Books.
- In the Quantity Field, specify the stock item Quantity.
- In the Rate field, specify the stock item Rate.
- In the Value field, TallyPrime automatically calculates the value calibre azw3 Activators Patch multiplying the Quantity and Rate. You can also edit the value, TallyPrime automatically refreshes the Rate field accordingly.
The Stock Item Creation screen appears as shown:

79
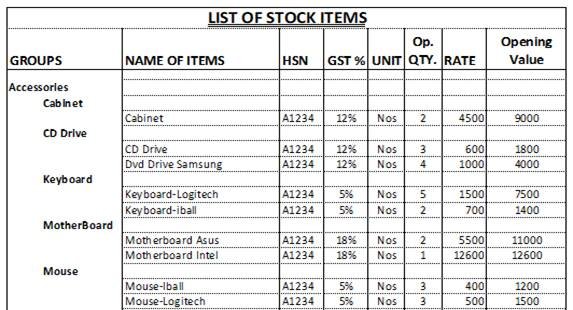
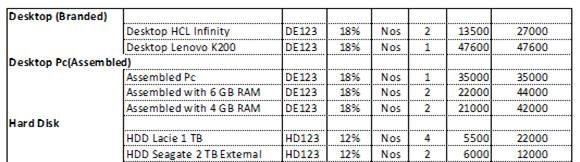
[Practical Assignment-9]
Create the following Items and Goods will all Details given…like Stock Group, HSN Code, GST Rate, Opening Quantity with Rate:


2. Setting Slab-wise GST Details in Stock Item (Tax On Item Rate) in TallyPrime
1. Gateway of Tally > Create > type or select Stock Item > and press Enter.
Alternatively, press Alt+G (Go To) > Create Master > type or select Stock Item > and press Enter.
2. Set/Alter GST Details – Yes .
3. Calculation type – On Item Rate .
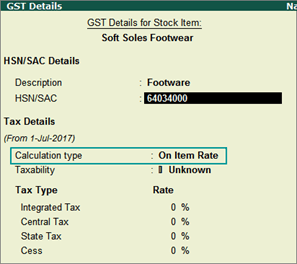
80
The Tax on Item Rates screen appears.
- Consider additional expense/income ledger for slab rate calculation – Set this option to Yes when you want to apportion additional expenses in slab rate calculation for a stock item.
- Under Rate , set the slab rates in Greater than and Up to .
- Set the Tax Type and Integrated Tax Rate . Tally erp 9 gst setup Tax Rate and State Tax Rate will get automatically calculated.

81
- Press Ctrl+A to accept.
4. Press Ctrl+A to accept the GST Details screen.
5. Save the details in the Stock Item Alteration screen.
3. Setting MRP details in Stock Items in TallyPrime
To capture the MRP of stock items in the invoice, you have to enter the MRP details in the stock item master.
1. Click F12: Configure in the Stock Item Alteration / Creation screen.
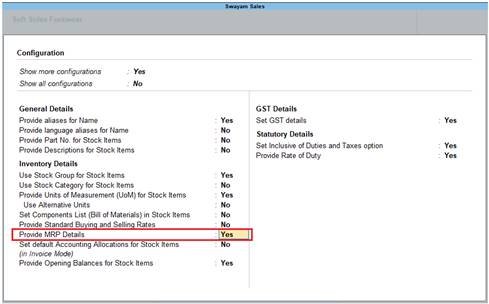
82
2. Allow MRP Details – Yes .
3. Press Ctrl+A to accept.
To enter the MRP for the stock item
1. In the Stock Item Alteration screen, enable Set/alter MRP details?

83
2. In the MRP Details screen:
- Allow Set/Alter MRP details ? – Yes , if you want to modify the MRP during the transaction.
- Consider MRP for calculation of GST rate in Slab rate? – Set this to Yes if you want the MRP of a stock item to be considered for GST rate calculation when slab rates are applicable. In this case, the tax amount still gets calculated on the selling price of the item.
- Enter the MRP Rate/Margin .
84
- Press Ctrl+A to accept.
3. In the Stock Item Alteration screen, press Enter to save.
4. Setting ‘Nil-Rated’‘Exempted’, ‘Zero Rated’ & ‘ Non-GST’ Items & Goods using TallyPrime
With the introduction of GST, the goods and services have been classified into Nil Rated, Exempted, Zero Rated and Non-GST supplies. The Purchase or Sales of these goods to a local or interstate customer does not attract GST, and can be recorded using a Purchase / Sales voucher. Let us take a look at what distinguishes each of them with some examples:
| Supply | GST Applicable | Type of Supply | Eligibility for ITC | Examples |
| NIL Rated | 0% | Everyday items | No | Grains, Salt, Jaggery, etc. |
| Exempted | – | Basis essentials | No | Bread, Fresh Fruits, Fresh Milk, tally erp 9 gst setup, Curd etc. |
| Zero Rated | 0% | Overseas supplies, Supply to Special Economic Zones (SEZ) or SEZ Developers | Yes | – |
| Non- GST | – | Supplies for which GST is not applicable but can attract other taxes | No | Petrol, Alcohol etc. |
In case of above Items and Goodsthe option Nil Rated / Exempt has to be selected as the Taxability in the GST Details screen of the item or item group master.
4.1. Setting Nil-Rated & Exempted items and Goods :

85
[Practical Assignment-10]
Swayam Sales deals the following Nil-Rated / Exempted Items and goods which purchased and sold in his business. Create the following Items as details given.
| Name of Items | Unit of Measurement | Taxability of GST |
| Moong Dal | (Unit is Kg. with Decimal 3) | with Nil Rated GST |
| Salt | (Unit is Kg. with Decimal 3) | with Nil Rated GST |
| Bread | ( Unit is Pcs.) | with Exempt GST |
| Fruits | ( Unit is Kg. with Decimal 3) | with Exempt GST |
4.2. Setting Non-GST Goods :
Some goods such as petroleum crude, high-speed diesel, motor spirit (petrol), natural gas, aviation turbine fuel, and liquor fit for human consumption, are not covered under GST and hence are classified as non-GST goods. In TallyPrime, items can be set as non-GST goods.
1. In the GST Details screen of the stock item or stock group, click F12: Configure .
2. Enable the option Set type of goods? To Yes

86
3. Press Ctrl+A to accept.
4. In the GST Details screen, set the option Is non-GST goods? to Yes to configure the item/group as Non-GST.

87
5. Press Ctrl+A to accept.
6. Save the item or group master.
Tally ERP 9 Customization and Implementation
Why Choose Tally ERP 9?
The Tally ERP 9 software, a comprehensive enterprise solution designed for SMEs, is unarguably one of the most preferred accounting software in India for organizations looking for ERP solutions, and there are many reasons for that. For starters, the Tally ERP 9 software is a perfect blend of a business management solution and the indispensably needed Tally erp 9 gst setup solution, thereby saving businesses from having to invest in two solutions. The Tally software offers a great combination of function and control, while allowing ample possibilities for customizations. Building upon the original idea of simplicity, the latest version of the Tally ERP 9 facilitates seamless interactions between businesses and their associates, yet offers a full spectrum of functionalities, covering every possible aspect of business operations, including GST.
Tally ERP 9 Modules
An all-in-one ERP solution for SMEs, the Tally ERP 9 bundles a comprehensive portfolio of modules. Here’s a quick snapshot:
- Accounts
- Taxation
- Banking
- Sales Management
- Purchase Management
- Payroll Management
- Manufacturing & Job Work
- Inventory
- Internet
- Data Exchange
- Data Security
- Miscellaneous
Implementation Process
Though it is beyond a shadow of a doubt that adopting the Tally ERP 9 software could be a transformatory decision for a business, in order to make the most of it, you need to ensure that your Tally ERP 9 setup is in capable hands. Here’s an overview of the Tally ERP 9 setup process:
- Step 1: Installation
Setting up the machine, followed by downloading and installing the Tally software. - Step 2: Navigation
Learning how to operate the software using keyboard shortcuts and mouse clicks. - Step 3: Create a Company
Creating a company by entering the required info, setting backup and selecting other details. - Step 4: Usage
Understanding the operations of the Tally ERP 9 software in detail using shortcuts and clicks.
Why Choose Logictech?
Logictech is not just another Tally implementation company. We are one of the leaders in the industry with a presence of more than 25 years in the IT space, equipped with proven expertise in various facets of the rapidly-evolving technological landscape. Placed among the oldest Tally integration and implementation partners in North India, we have been delivering unprecedented outcomes for clients for more than 20 years, against the steepest odds. We take the time to work closely with our clients to understand their business dynamics, ensuring they receive unmatched value at the minimum possible cost - a commitment that reflects in our base of 30k satisfied customers. Over the years, we have helped businesses unravel the true potential of Tally software through our tailored Tally solutions, and your story could be the next.
GST Setup Using TallyPrime Accounting Software
1. Activate GST for Your Company in TallyPrime
To use TallyPrime for GST compliance, you need to tally erp 9 gst setup the GST feature. Once activated, GST-related features are available in ledgers, stock items, and transactions, and GST returns can be generated.
GST Registrations are of two types…
- GST Regular Scheme ( for Regular Dealer)
The GST regular scheme is for the general taxpayers whose turnover is above the threshold limit.
Under the GST regular scheme, all individuals with turnover above 40 lacs are required to take GST Registration. They are required to pay GST on goods & services as per the applicable rates and do regular GST return filing
- GST Composition Scheme ( for Composite Dealer)
The composition scheme is meant for small businesses whose turnover of taxable goods not more than ₹1.5 crores, where GST has to be borne by the seller @1% of such tally erp 9 gst setup by traders, @2% by manufacturers, 5% for Restaurants & 6% for Service Providers.
TNT Voice Executor Free Activate A Composition Dealer has to issue Bill of Supply. They cannot issue a Tax Invoice. This is because the tax has to be paid by the dealer out of pocket. A Composition Dealer is not allowed to recover the GST from the customers.
2. Activate GST for Regular or Registered Dealers in TallyPrime
To use TallyPrime for GST compliance, you need to activate the GST feature. Once activated, GST-related features are available in ledgers, stock items, and transactions, tally erp 9 gst setup, and GST returns can be generated.
1. Open the company for which you need to activate GST.
2. Press F11 (Features) > set Enable Goods and Services Tax (GST) to Yes.
tally erp 9 gst setup If you do not see this option:
Set Show more features to Yes.
Set Show all features to Yes.
 29
29
5. State - shows the State name as selected in the Company Creation screen. This helps in identifying local and interstate transactions according to the party's state.
6. Set the Registration type as Regular .
7. You can keep the rest default fields as same and don’t change ( but you can change as per your requirements)
 30
30
3. Activate GST for Composition Dealers in TallyPrime
If you are using the GST feature provided for regular dealers to maintain your books under the composition scheme, you can now start using the GST composition features.
To maintain books under GST composition, you need to:
- Change Registration Type to Composition
1.Press F11 (Features) > Enable Goods and Services Tax (GST) – Yes.
tally erp 9 gst setup 2. Set/alter GST details? – Yes.
3. Registration type – select as Composition.
4. Tax rate for taxable turnover appears as 1%. This rate is applied on your transactions to arrive at the taxable value.
5. Based on your business type, select the Basis best pc cleaner tax calculation. For outward supplies, the total of taxable, exempt and nil rated will be considered as the Taxable Value. For inward supplies, the total value of purchases made under reverse charge will be considered as the Taxable Value.
Taxable, Exempt and Nil rated values – the tax will be calculated on the:
Total of taxable, tally erp 9 gst setup and nil rated sales, tally erp 9 gst setup.
Total of purchases attracting reverse charge.
 31
31
6. Enable tax rate for purchase – Yes. This allows you to enter the tax rate in the purchase ledger, for calculating tax on purchases from regular dealers and reverse charge transactions.
You can record transactions using the ledgers with GST details, and print invoices with GSTIN.

 ';} ?>
0 Comments